Seattle Makers 3D Printing Guide for FDM
To print FDM at Seattle Makers, we use software (called a slicer) named PrusaSlicer. There are many other slicers out there, but this works best with our printers. You can also set a profile for other printers that are not made by Prusa. Below is a guide to getting started, as well as reference materials for those who have completed certification.
Awesome reasons for using PrusaSlicer:
- You can test slicing (preparing prints) files at home.
- It’s free.
- Competitive feature-wise as compared to Simplify3D (a $100 software).
- If you slice on-site on your laptop, you can wirelessly send print jobs to the printers. No touching of SD cards or the public computer.
- It is optimized for use with our Prusa MK3s Printers (same company).
ℹ️ Note: You may need to be re-certified if you previously used Simplify3D, but many of the lessons you’ve learned about our previous printers will still be relevant. Printing will be easier than ever before.
*If needed, Simply3D is still on the computer here at the space, but it will not be the preferred method or updated.
First Time Setting up PrusaSlicer
PrusaSlicer Software
The latest stable release of PrusaSlicer can be always found on the Prusa website in the DRIVERS & APPS package, and it’s available for Windows, Mac OS X, and Linux. The package also includes test objects and printer drivers, but you can choose to install only PrusaSlicer.
- You can also download a standalone installer for your computer at PrusaSlicer introduction & download or at our GitHub.
- Download the appropriate file type for your computer
- Allocate Download Folder
If you’re new to PrusaSlicer, check out their awesome documentation for getting started. We also cover how to use it in our 3D Printer certification course.
First Time Opening PrusaSlicer
Upon opening PrusaSlicer the first time, the Configuration assistant will automatically run.
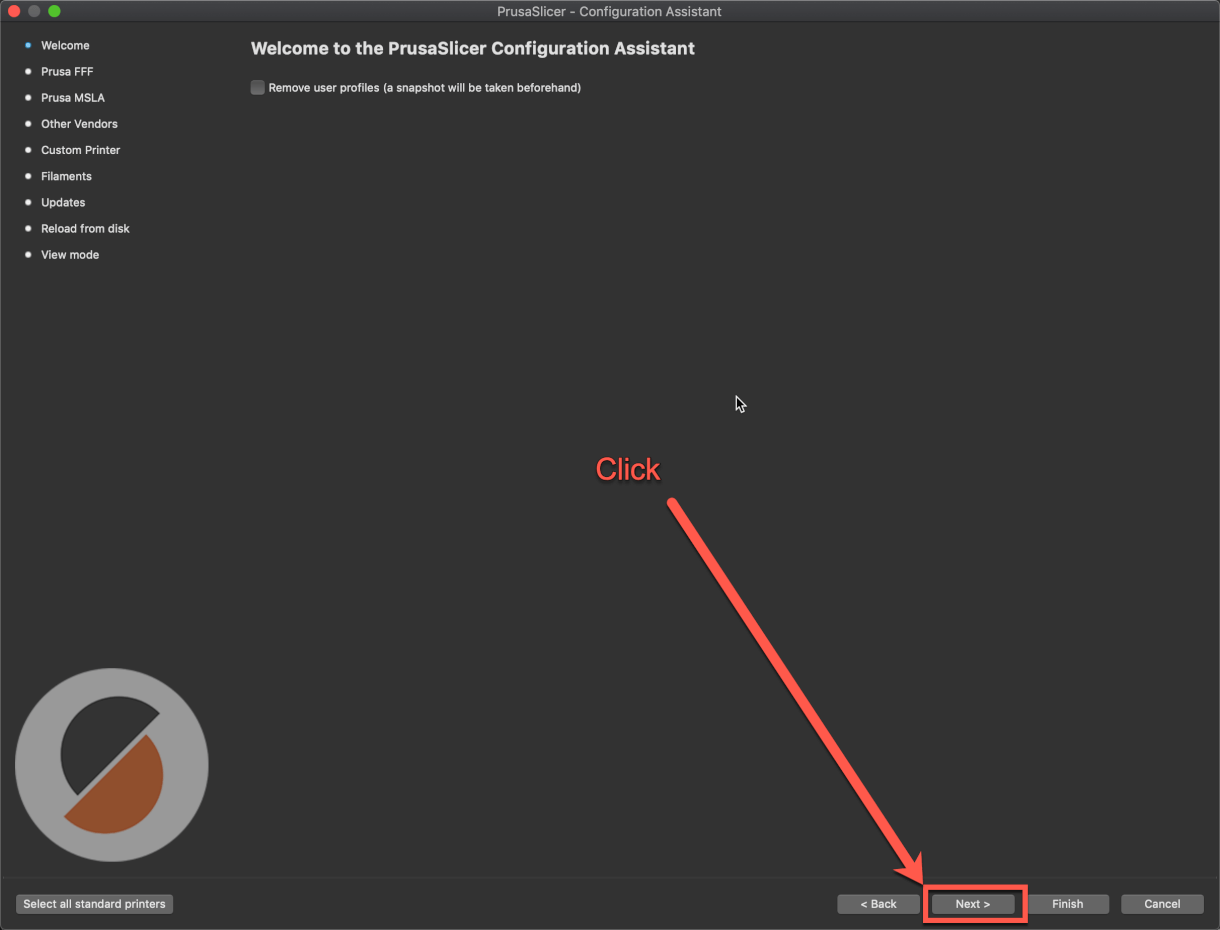
Then select:
2. Three check boxes shown here for the Original Prusa i3 MK3S & MK3S+. (.25, .4, .6, .8)
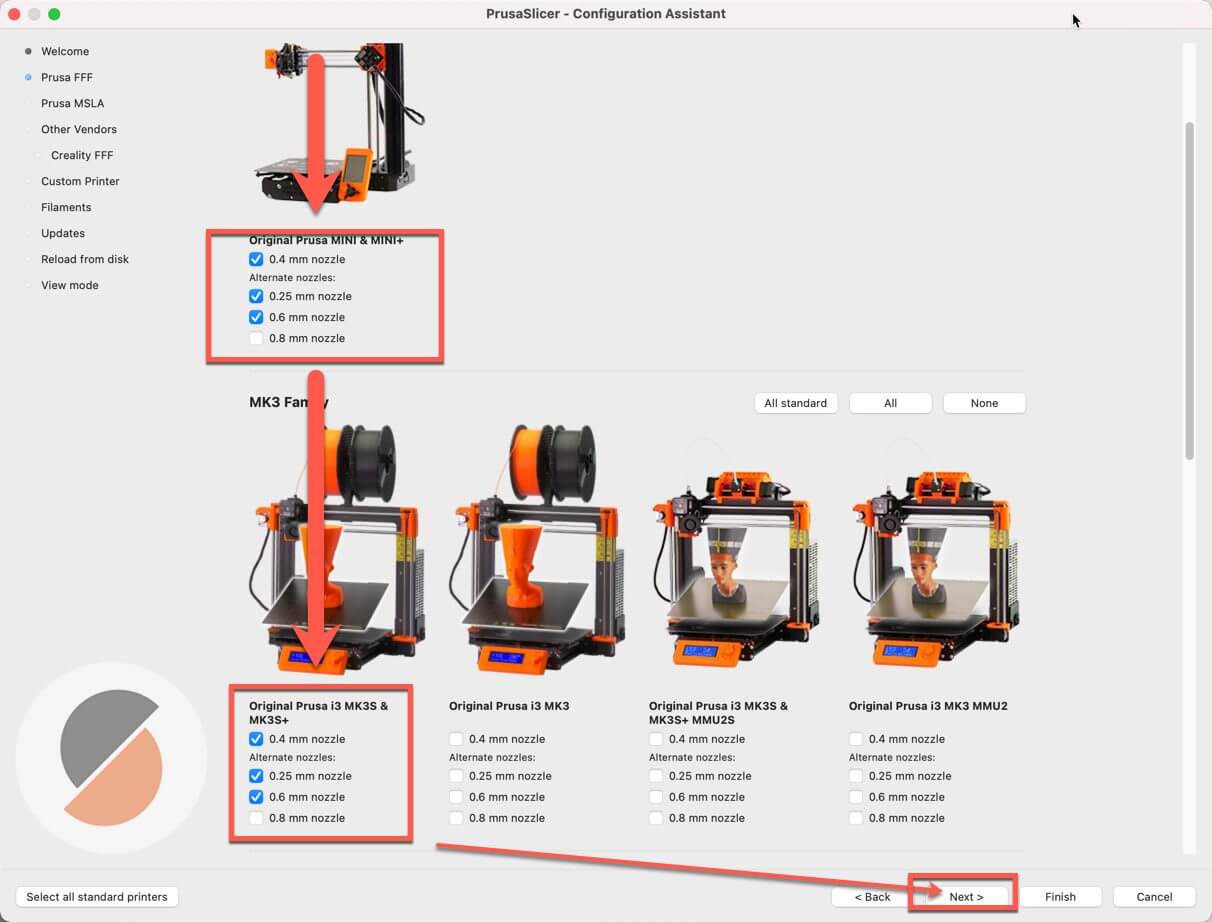
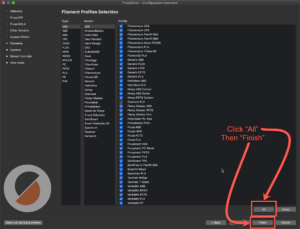
Click next until you see Filament Profiles Selection. Click All, then Finish.
Setting up Printer Profiles & Settings
Our Prusa MK3s printers are stock, so using the default profiles we just installed in PrusaSlicer should work fine. However, we also have some non-Prusa printers that have some specialized profiles, as well as needing to add our filament profile. Franklin, our large format printer, is one example. We have our profiles online for download, so you can install them for your use.
Download our custom profiles by clicking here.
- Unzip the file
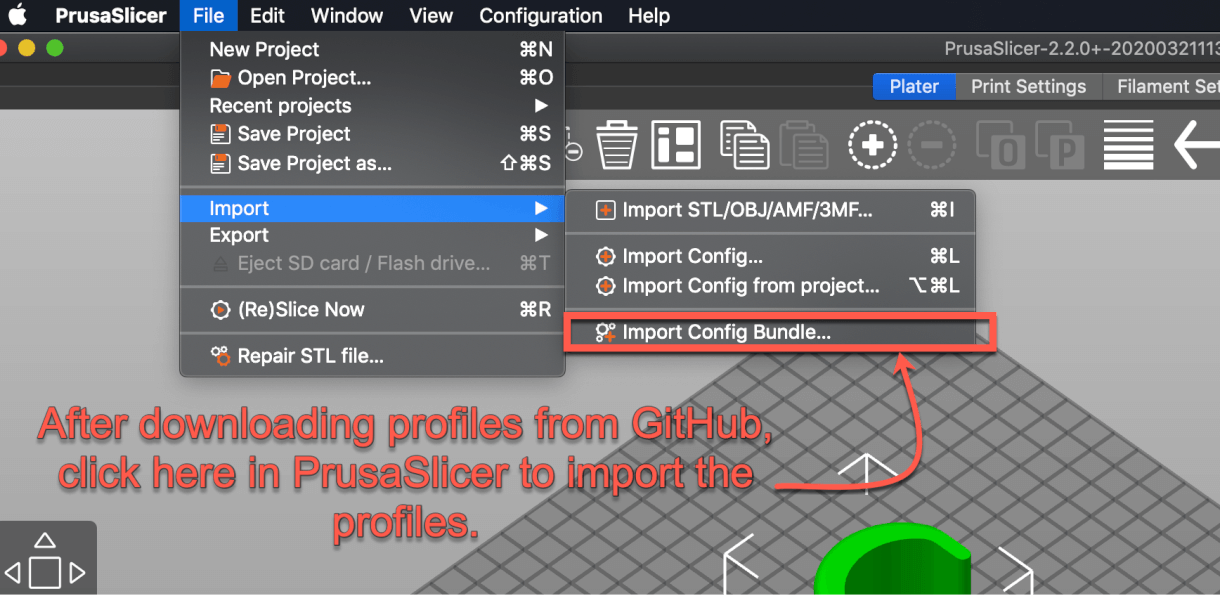
- Open PrusaSlicer and click on File>Import>Import Config Bundle
- Select the file SeattleMakers_config_bundle.ini to import all the profiles for our printers.
- If they import successfully, congratulations!
Safety
- Get trained on the safe and efficient use of the printer before you use it.
- Do not touch the nozzle or bed of the 3D printer with your hands. It is over 400°F when in use. Always assume that the nozzle is this hot. Use tweezers to clean extra filament from the nozzle.
- Use gentle pressure or twisting to break parts loose when removing parts from a print bed. If this does not work, use the supplied tools. This will keep the machines, your hands, and your print in good shape.
- Start at one corner of the part and move slowly when using the supplied print removal tools. Only apply the necessary amount of pressure. Most parts can be freed by getting the scraper just under the part, then twisting the scraper slightly to loosen the part.
- Always push away from yourself. Never put your hand or any part of your body in the potential path of the sharp object.
- This 3D Printer is only compatible with 1.75mm PLA filament. Wait for the printer to completely stop before removing the print Stay an arm’s length away from the printer when in use
- If there is visible damage to the printer before, during or after use, inform staff/ volunteers.
- Always keep the area clean Inform staff/ volunteers if filaments need to be replaced or any tools/equipment is missing.
- Only use the cleaning equipment provided
How to Print!
The overview of Printing!
- Slice Your File
- Prepare The Printer
- Send G-Code to printer (Print!)
1. Slice Your File
To ensure that our printers continue to operate at peak efficiency please use our profiles. How to install them is shown right above this post.
Default Printer Profiles & Settings
These are the recommended starting settings for our printers. As part of the 3D printer certification, we show you step by step how to use PrusaSlicer if it is your first time.
ℹ️ Note: The rest of this sections assumes you have installed our profiles. Please see above for instructions on installing our printer profiles.
Jinja & Admiral – Prusa MK3s
Print Settings: 0.20mm QUALITY
Filament: eSun PLA +
Physical Printer: Original Prusa i3 MK3S - Jinja
After choosing the preferred settings in PrusaSlicer:
- Import your model (STL, OBJ, AMF, 3MF)
- Arrange on build plate
- Make necessary changes to layer height or other settings.
- Slice your file
- Repeat as necessary
As always, Maketeers are here to help if you have questions about slicing.
Here’s a link to the documentation about PrusaSlicer.
2. Prepare The Printer
- Check the printer bed for previous print, please ask a Maketeer or the printing member if a print is complete to remove it from the bed. Please don’t be responsible for breaking someones print.
- Schedule & Pay
- Book time on the Google Calendar
- Pay in the store for your machine time.
- If the print fails and has to be stopped mid-print, you will only be charged for the time the print was running and be refunded the difference.
- Choose Spring Steel Bed Type
- Determine the correct Spring Steel Sheet (bed) to use based on Filament Type
- PLA, ASA, PP = Smooth Sheet
- PETG, TPU, FLEX = Textured Sheet
- Steps to change Spring Steel Sheet (bed) – Please follow these instructions carefully, not following all steps will result in damage to the printer. This article goes into more detail about changing the steel sheets.
- Sheets are kept on the shelf below the printers
- Remove the current spring steel sheet
- Grab new sheet, remove the clip with the label “Change Type,” and place it on the old sheet.
- Place new sheet on bed
- Change the sheet type on the printer
- Enter Menu
- Scroll down to “SHEET”
- Hit Enter once
- Verify the name now matches the sheet type (Smooth1 = Smooth Sheet, Textur1=Textured Sheet)
- Determine the correct Spring Steel Sheet (bed) to use based on Filament Type
- Clean/Prepare the bed
- Ensure the bed is clear of debris and filament
- Wipe the bed down with KimTech Tissue Wipes and isopropyl alcohol
- Ensure filament is loaded and is the correct color
- To Un-Load Filament
- Using the wheel on the printer, navigate to “Un-Load Filament”
- It will ask for filament type, choose PLA
- Wait for the printer to heat up.
- Press the Button to unload (Franklin will unload automatically when it reaches temp)
- Remove roll carefully, ensuring it doesn’t become unwound.
- Clip off the very end of the filament to remove the blob.
- To Load Filament
- Place roll of filament on printer
- Clip off the very end of the filament is there is a blob.
- Insert filament into extruder head
- For Prusa
- It will detect there is filament.
- For Franklin
- Using the wheel on the printer, navigate to “Load Filament”
- It will ask for filament type, choose PLA
- Wait for the printer to heat up.
- Press the Button to load (Franklin will load automatically when it reaches temp)
- If filament is flowing correctly
- For Prusa
- Extruding Correctly? Yes
- For Franklin
- Continue Purge? No
- For Prusa
- Remove extruded filament from nozzle.
- To Un-Load Filament
3. Send G-Code To Printer (Start Printer)
No longer will you have to transfer your files to an SD card, and then manually insert the card into the printer. Using a raspberry pi and a program called OctoPrint, we now can send our G-Code directly from the slicer or web interface to the printer.
ℹ️ Note: If you are having trouble with an Octoprint Interface, please ask a Maketeer. SD cards can be used as a backup, but please defer to them to make that determination.
There are two ways to send your print.
Directly from PrusaSlicer
This requires you to install an API Key in PrusaSlicer. Please contact Jeff on Slack (@Jeff) to get the API key. This allows you to send files to OctoPrint and start your print without using the web browser.
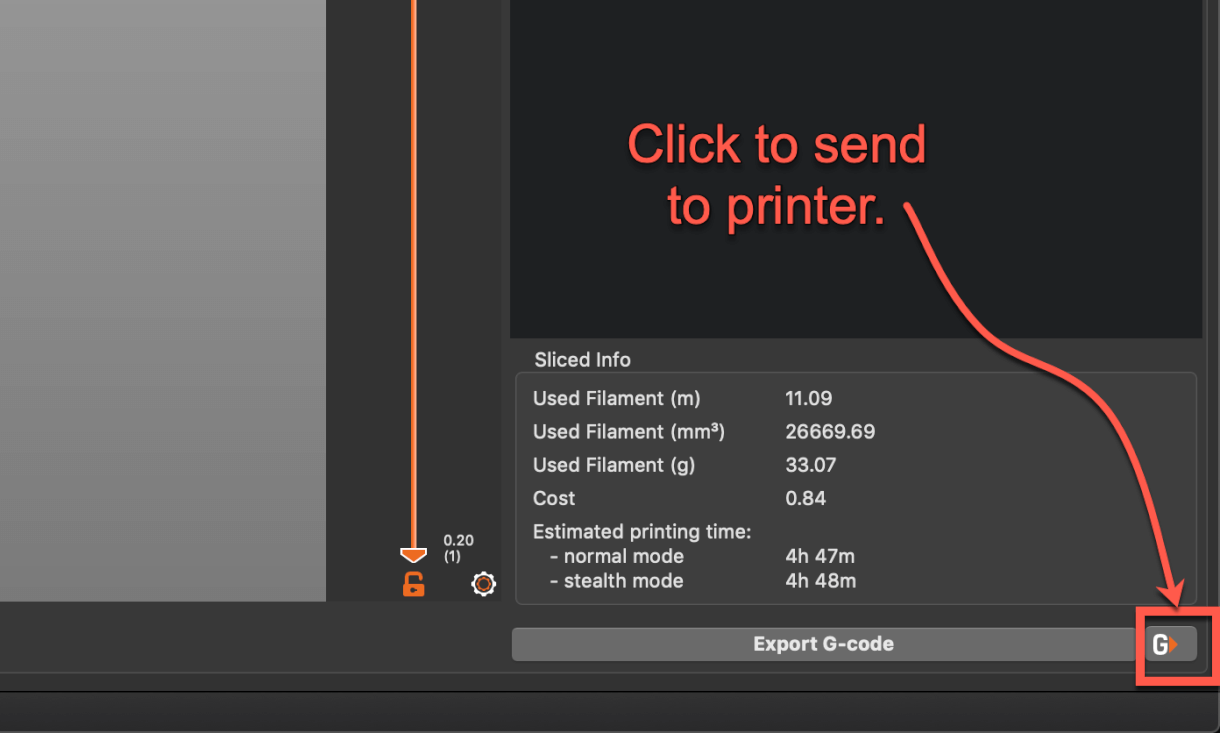
After you’ve finished slicing:
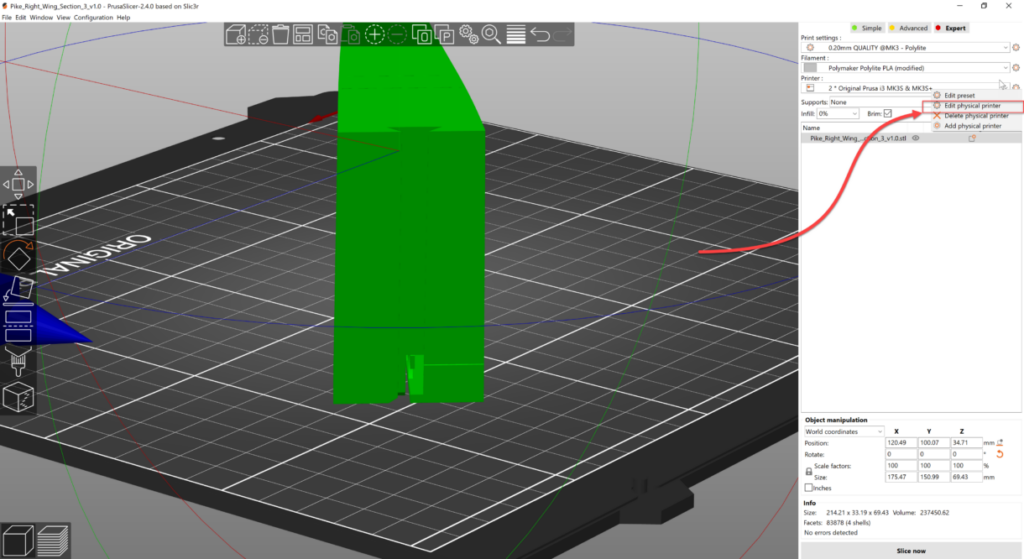
- Double check you have the correct printer.
- Click the tiny button in the lower right corner “G>.”
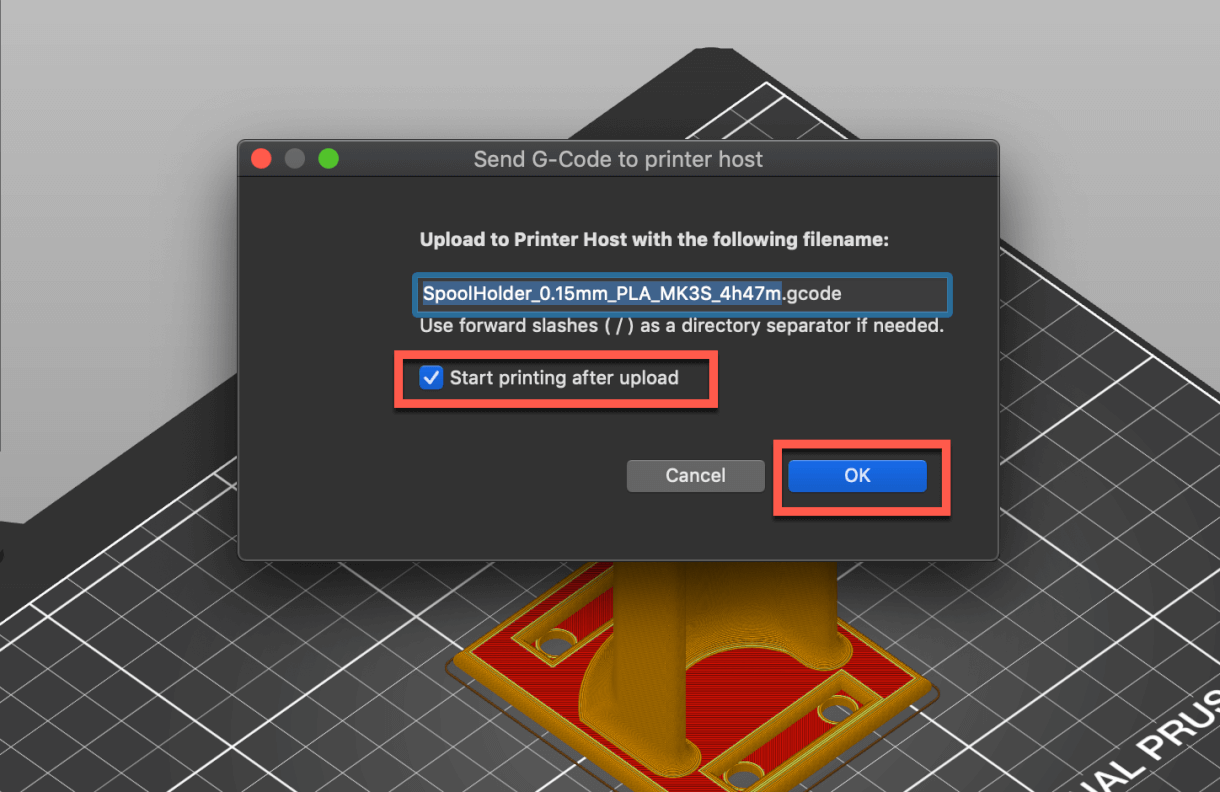
- If desired, check “Start Printing after upload.”
- Click “OK.”
Upload via web browser (When on-site)
After you’ve finished slicing:
- Export your sliced file to the desktop.
- Ensure you’re on Seattle Makers Wifi.
- Open a web browser and travel to Octoprint page.
- Convention for webpage is http://octopi{name of printer}.local/ (example: http://octopifranklin.local/ allows you to get to Printer “Franklin”)
- Login to OctoPrint (case sensitive).
- Login: member
- Pass: letsprint
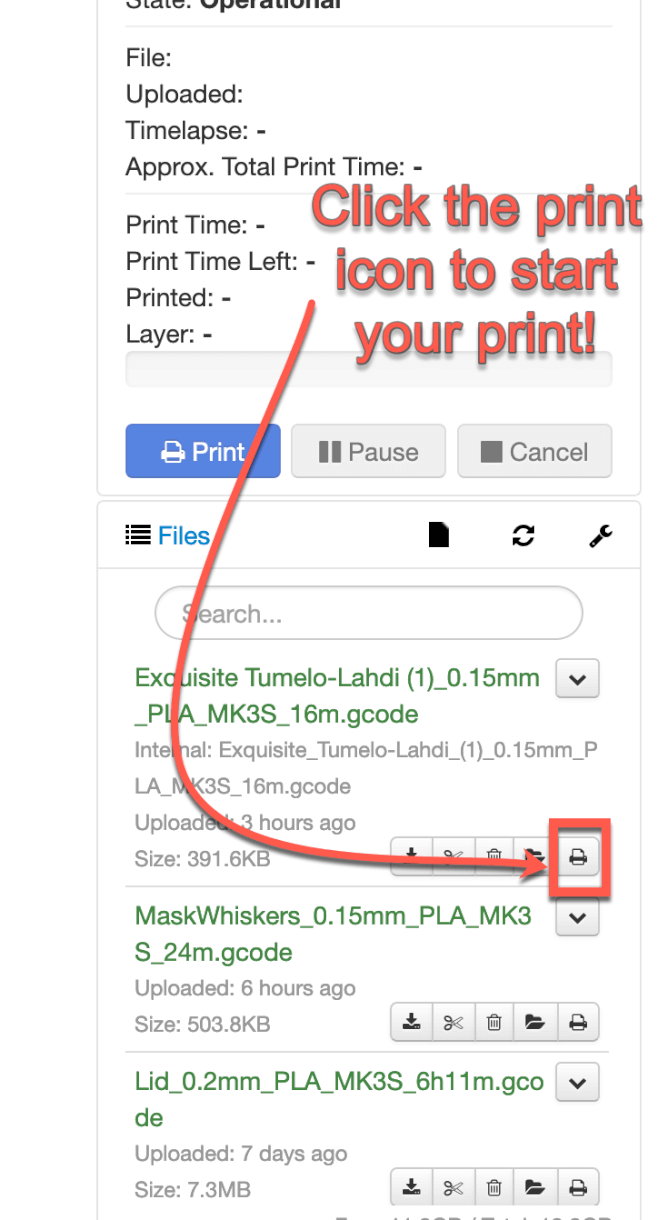
- Drag your file onto the OctoPrint web page. The page will change while dragging, and aim for the left side where it says “Upload Locally.”
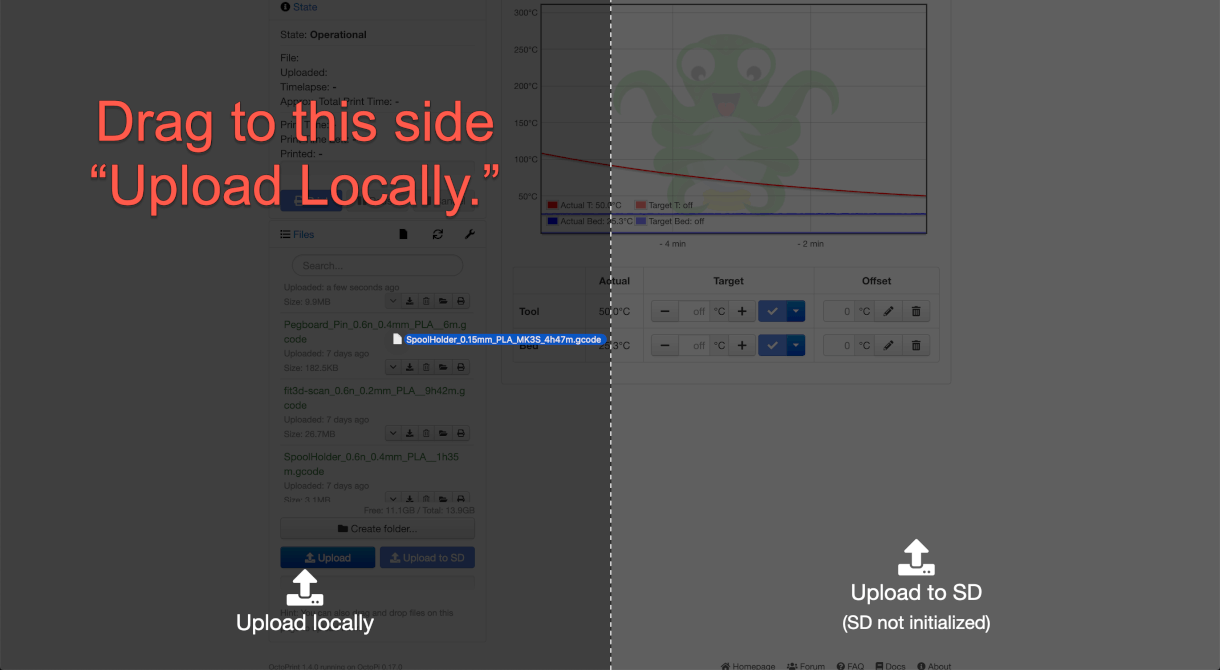
- Check the name to make sure it’s your file, and click the print icon on your Print!
- If it’s helpful, you can click the small wrench to change to “sort by upload date.”
Importing a 3D Model
Supported File Types
3MF – The preferred file format is also used to save Project files.
STL – Both binary and ASCII format is supported.
STEP – The STEP file is triangulated during import.
OBJ – Information such as material and texture is ignored during import.
Two Methods of Importing a Model into Prusa Slicer
Navigate to the Top Menu bar. Click on the Cube with the plus sign. Upload 3D model from computer library.
Navigate to File → Import → STL/ 3MF/STEP/OBJ/AMF…
Shortcut – Ctrl + I
How to Install the OctoPrint API’s
Ask Jeff or Jeremy via Email or Slack for an API Key. One is needed for each printer.

Other 3D Printing Resources:
Find and compare filament colors at https://filamentcolors.xyz/library/
3D Resources
Getting a 3D model Generally speaking, a 3D model can be obtained through one of the following ways:
- Downloading a 3D model from the internet
- Creating your own models
- 3D scanning a real-world object
Online libraries and 3D hubs The easiest way to get started with 3D printing is to find 3D objects available on the internet for free. They usually come in .stl or .obj file formats. There’s a number of websites that offer a wide range of downloadable models – the best ones are listed below:
- Thangs is the fastest growing 3D community with over 15,244,288 available models to search, store, and collaborate. This website will search all of the other websites for 3D models. This is the best way to search for a particular thing but will be given a large scope to look through.
- Thingiverse is the richest 3D archive on the internet. Currently, it offers more than 1.2 million models for free download – and the number keeps growing every day. It became a popular place for downloading, sharing and showcasing all sorts of 3D models.
- MyMiniFactory A popular repository with around 50,000 models by professional designers. All models are tested before publishing, so you can be sure you’re getting great quality STLs. The price of paid models is usually between 4 to 40 USD. Also, there is a great free repository available.
- YouMagine is a community website backed by Ultimaker. Models are divided into popular categories or collections curated by the site’s users. As of right now, the portal offers over 15,000 models for download.
- Pinshape A repository with more than 25,000 free 3D models and several thousands of paid models. An interesting difference between this site and the rest are various collections based around popular brands, such as Lego, IKEA or GoPro. According to the creators, Pinshape is a shop with high-quality 3D models. However, the website also offers many models for free. Designers can use this web to sell their own creations.
Prusa Community hub for all Prusa printer owners, and the only online library offering pre-sliced and print-ready G-codes! But it’s much more than just a library of STL or 3MF files! Join now and engage with the community in a variety of ways!
3D modeling
3D Modeling software Nowadays, you can pick from a wide range of various 3D modeling applications. There are simple and easy-to-learn (and often web-based) applications such as TinkerCad. You can try parametric modeling with OpenSCAD, or use a fully professional tool such as the popular Autodesk Fusion 360. All these applications enable you to create a model and export it as an STL file.
Tinkercad is a great and intuitive tool for beginners. It’s free, although a registration is required. You can find plenty of tutorials, guides and tips online. TinkerCad is built around the idea of a basic library with various shapes, which can be dragged into the main window and further modified. The application lacks advanced functions, however, it can import and edit an existing STL file. Tinkercad is available at
FreeCAD is an open-source parametric 3D modeler made primarily to design real-life objects of any size. Parametric modeling allows you to easily modify your design by going back into your model history and changing its parameters. www.tinkercad.com.
Autodesk Fusion 360 If you want to start designing more complex objects, or even various components that should fit together, then you need to select a more professional tool. Fusion 360 is a popular option. Users can work in both CAD (Computer-aided Design) and CAM (Computer-aided Manufacturing), strength analysis or visualizations. Fusion 360 offers not only parametric modeling, but even sculpting as well.
Blender is probably the best free 3D modeling tool available today. It’s developed under an open source license and it’s available for Windows, Mac and Linux. It may be a bit too complex for a beginner, chaotic even. However, it has found its way into the hearts of many users. Especially users with artistic ambitions, who don’t need precise parametric modeling, found Blender to be an amazing tool. Sculpting, texturing, animations… Blender is a Swiss army knife among 3D modeling applications.
OpenSCAD is an open-source project available for free from www.openscad.org. It takes a completely different approach to 3D modeling – everything is done by writing code. The user interface is divided into two parts. In the left section, the user defines 3D objects by ‘programming’ them, while in the right section, a 3D preview is displayed. The application works mostly with a couple of primitives (cube, cylinder, sphere,…) and basic boolean operations (join, cut, intersection). However, the program also allows for advanced scripting – you can use commonly known operators, such as if, while, for, logical operators and others. If you feel you are more of a programmer than an artist, you may give OpenSCAD a go.
You can also try the following applications:
Microsoft 3D Builder, Meshmixer Rhinoceros 3D, Autodesk Inventor, SolidWorks Autodesk, AutoCAD, and SketchUp.
3D Scanning
Photogrammetry (or SFM – Structure From Motion) is a process that estimates the three-dimensional coordinates of surface points using pictures of a single physical object taken from different angles. At least that’s the oversimplified one-line explanation. You take a bunch of pictures of the object from all possible directions, then you use these photos as an input for a specialized software. This software will look for features that are visible in multiple pictures and try to guess from which point the picture was taken. Knowing the camera positions and orientations, it creates a 3D point that corresponds to the 2D feature on the photo (basically a pixel). Ideally, you’d get a finished 3D mesh as an output. But often it might be better to process the reconstructed points into a mesh manually for much better results.
For more information on photogrammetry and the necessary software click here
Maintenance etc.
Various info on upkeep and repair of 3D printers.
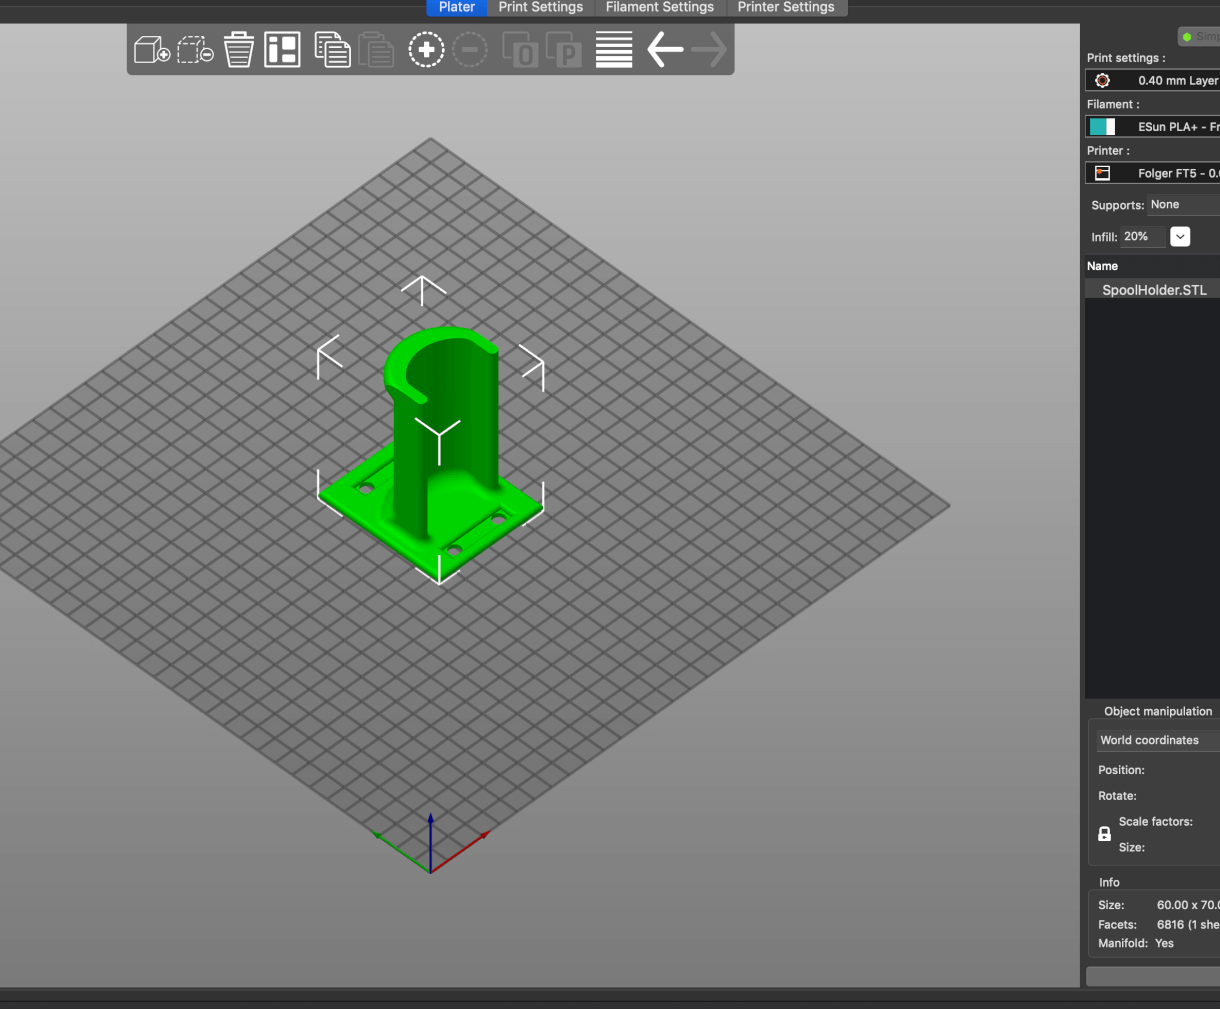
Filament Spool Holders
Occasionally a part on the filament holders breaks – the original model is here: https://www.printables.com/model/6781-prusa-i3-mk2s-mk3-spool-holder-frame-mount-top-loa/files and files are saved on the 3d printer station computer under C:\maker-space-files\prusa-i3-