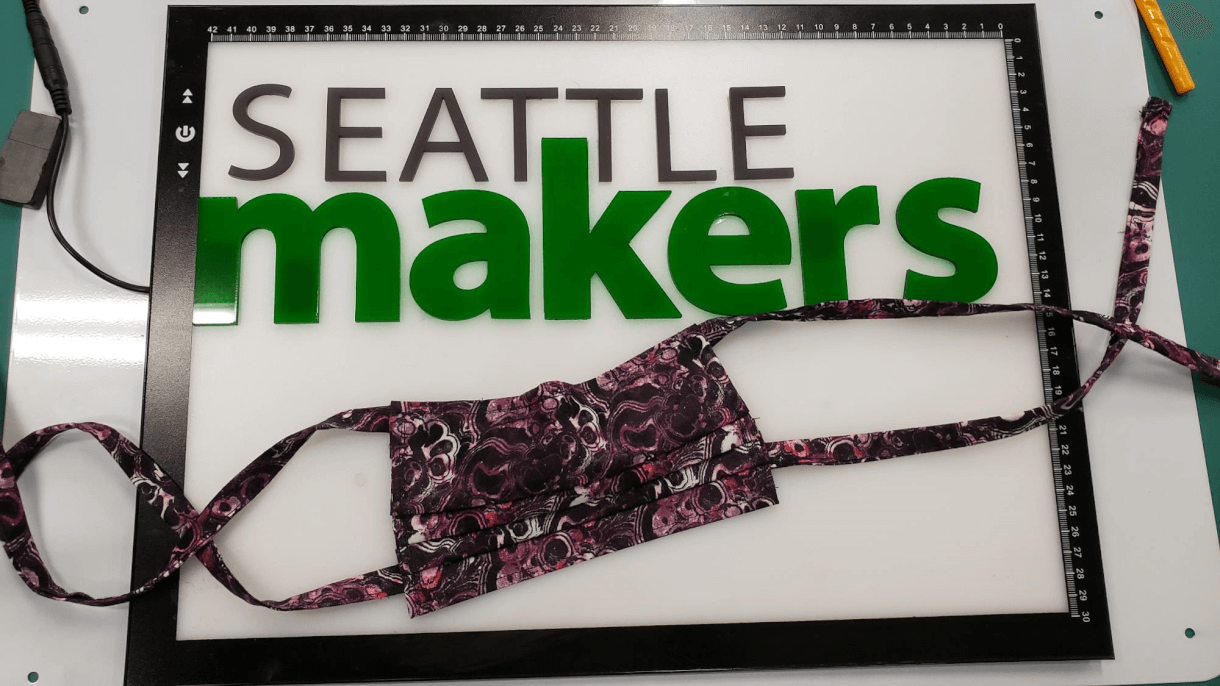
Sewn face mask
Updated 07.06.20 at 14:52 PST
We have tried out two different versions of this face mask:
- Laser-cut fitted mask: the version uses fabric cut out on our laser cutters, and comes in three different sizes. It’s design is easier to sew – instructions are here.
- Pleated mask: this version is one-size-fits-most, and includes a pocket for extra filter material. It is more complicated to sew – instructions are here.
If you live in the Seattle area, both options are available for free (as supplies and funding allow) – you just need to fill out this form. Kits for the laser-cut fitted mask are available for pick-up as well if you want to make your own – request a kit on this form. If you are able to cover the costs of your products, please donate here.
Laser-cut fitted mask
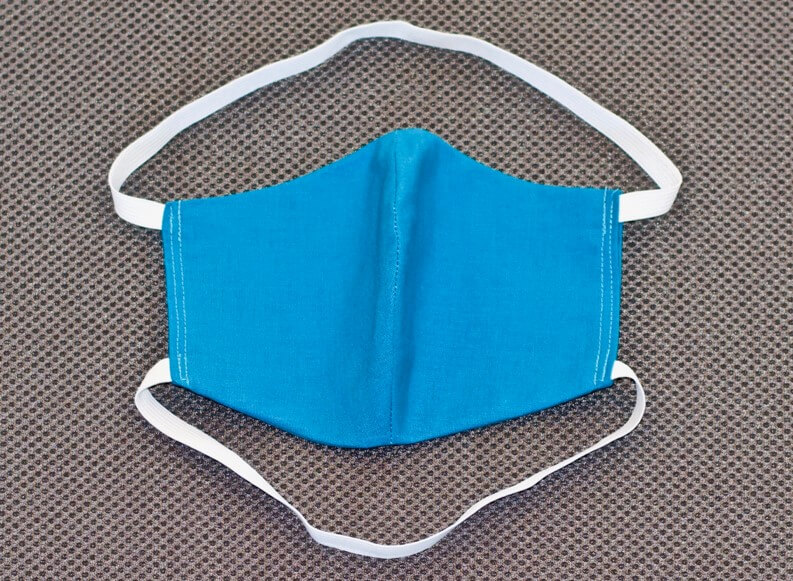
This is a 2-layer fabric mask with elastic ties. This face mask was designed by local sewer extraordinaire Jeni Falldine.
Disclaimer: These do not meet the medical standards for surgery, and are meant to be a solution with off-the-shelf materials to create an effective viral barrier.
We will be providing kits for this mask at Seattle Makers. If you are interested in helping with this project you can request one and follow the instructions below.
Download the pattern
You download the pattern for each size below.

Laser-cut fitted mask (all sizes) by Jeni Falldine is licensed under a Creative Commons Attribution-NonCommercial-ShareAlike 4.0 International License.
- Small mask (for youth): .ai file, .dxf file, .pdf file
- Medium mask (fits most adults): .ai file, .dxf file, .pdf file
- Large mask (fits larger faces and/or folks with beards): .ai file, .dxf file, .pdf file
Supplies
- Fabric
- 100% Cotton, tightly woven (this is important)
- 2 pieces of left side, 2 pieces of right side (provided in kit)
- Elastic
- 1/2″ wide
- 2 lengths – one longer, one shorter (provided in kit)
- Thread
- Pins
- Scissors
- Iron
- Sewing machine
Assembly
Watch the video below or scroll down for step-by-step instructions.
Want to see more from Jeni? Check out her jewelry and fiber arts.
Step 1. Lay out your pieces. You’ll have four identical pattern pieces and two pieces of elastic. The top of pattern is more curved and longer to accommodate the shape of the nose. One piece of elastic is longer (for around the head), the other shorter (for around the neck).
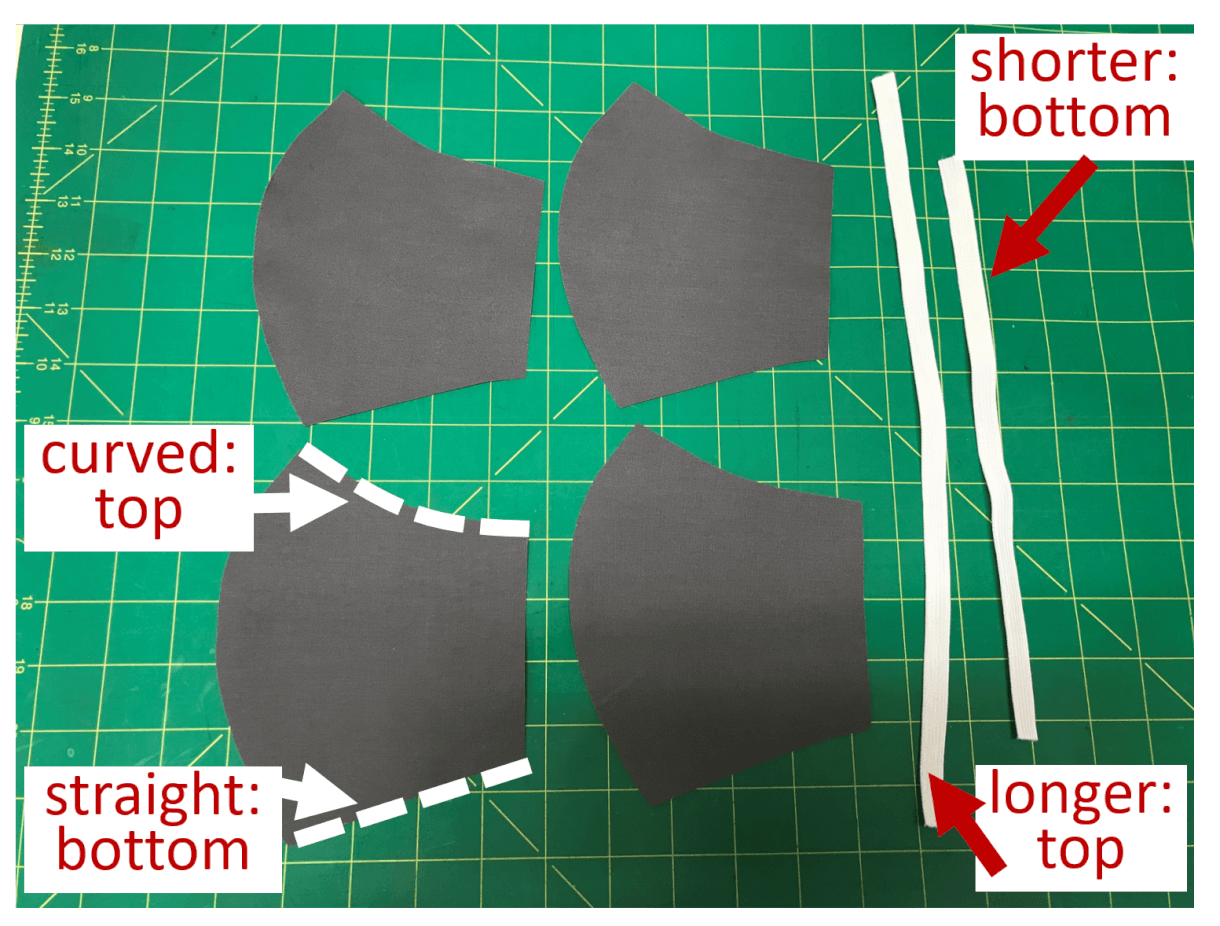
Image 1: Four identical fabric pieces and two pieces of elastic.
Step 2. Pin two pattern pieces together, with outside of fabric facing inside. Do this for both sets.
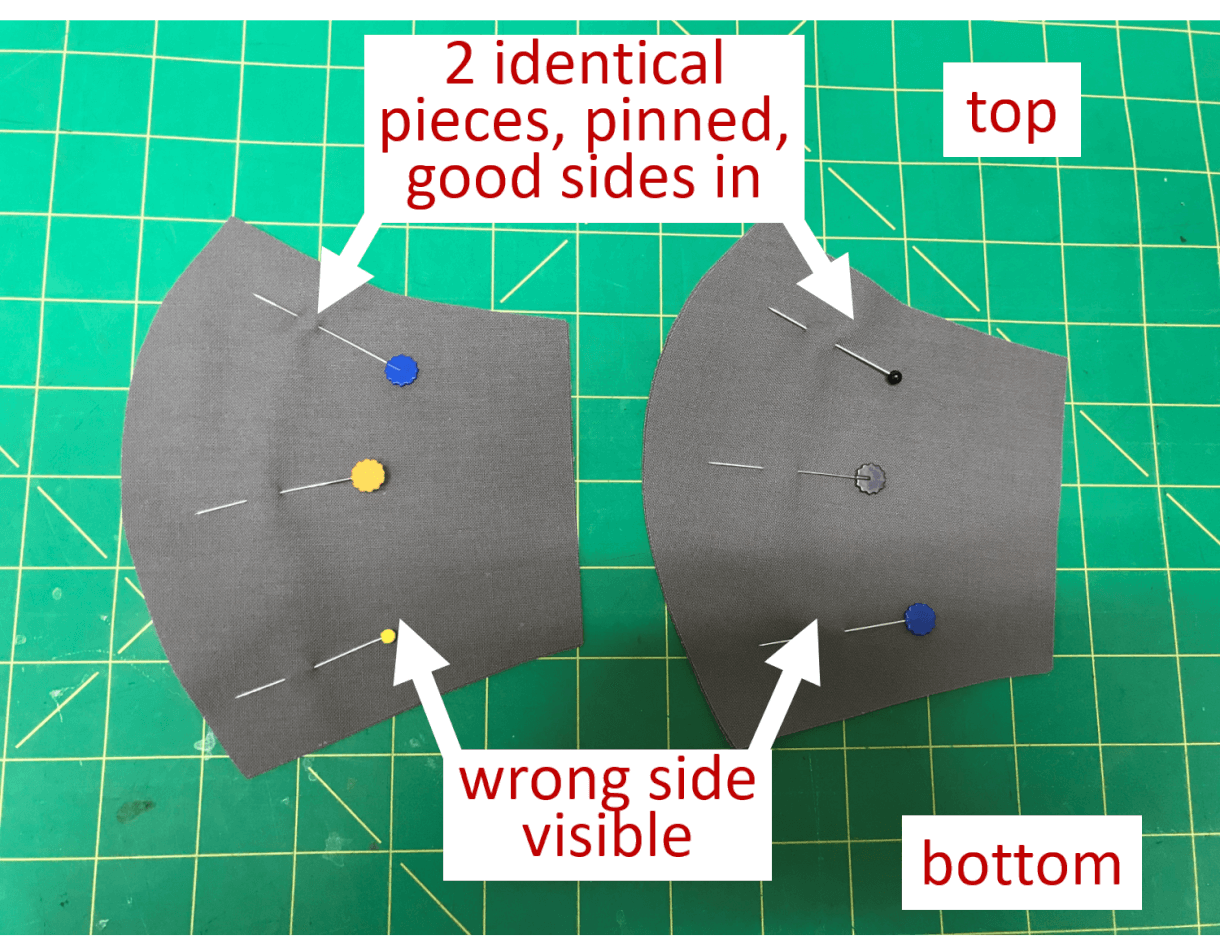
Step 2. Pin two pieces together, good sides together. Repeat for the second set.
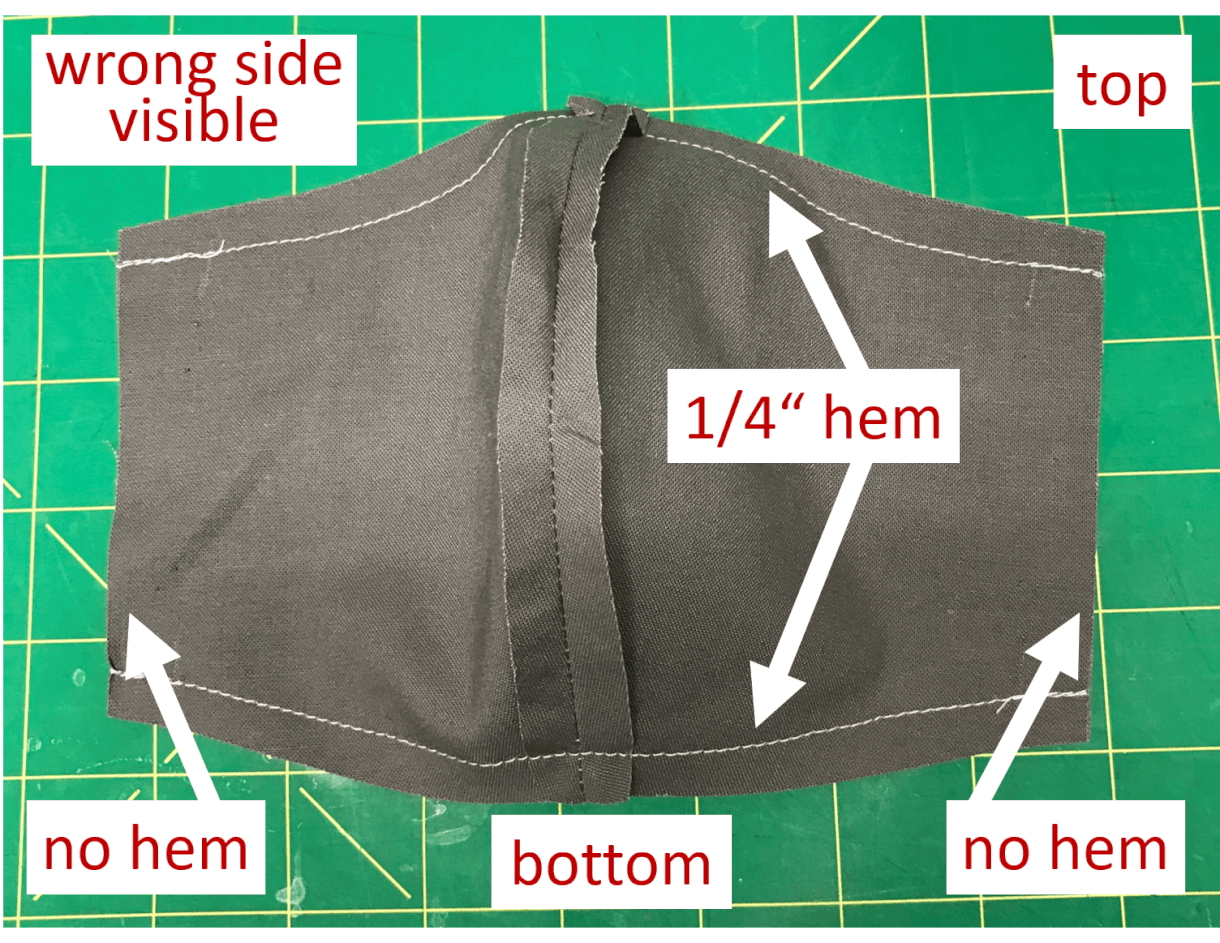
Step 3. Sew middle seam 1/4″ from the edge, backtacking at start and finish. Repeat for second set.
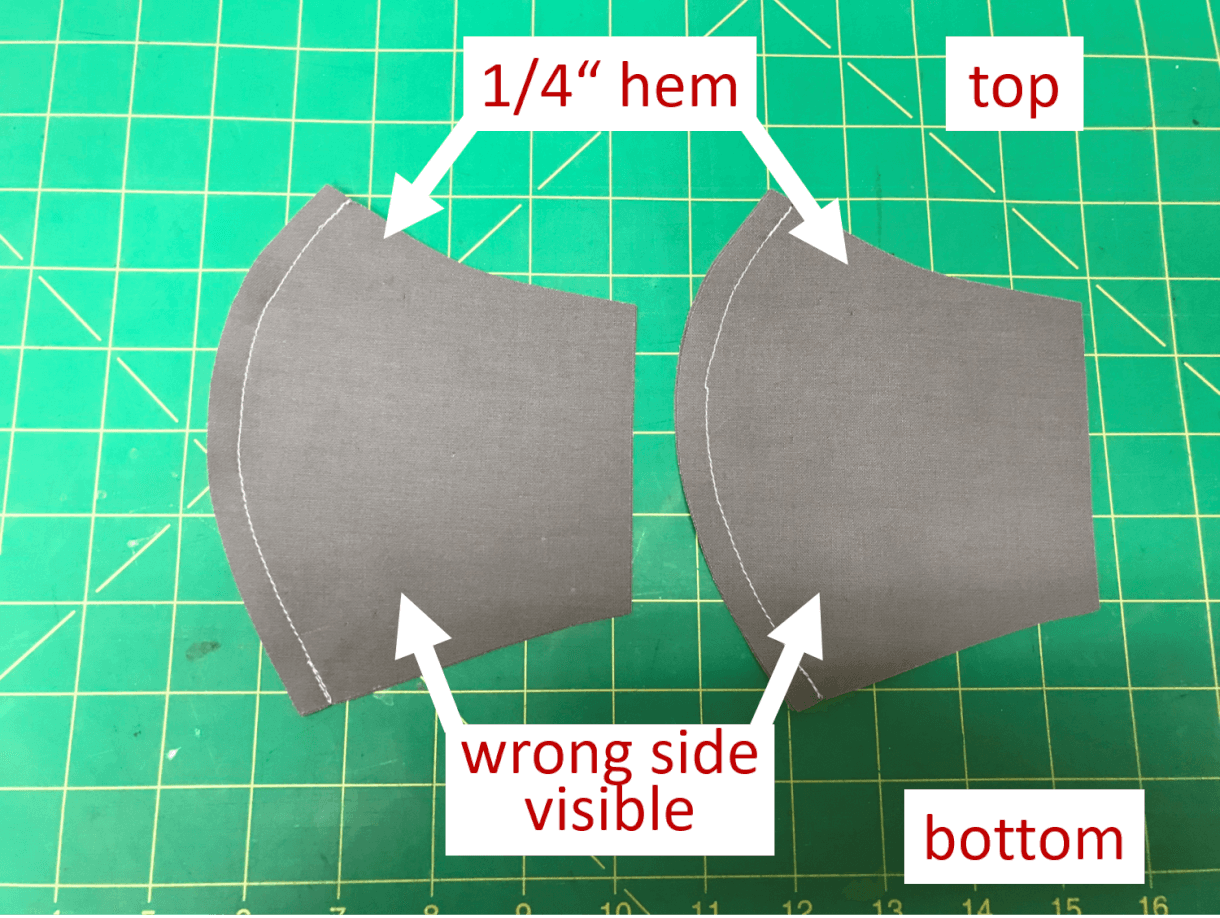
Image 3. Sew 1/4″ hem along middle seam.
Step 4. Press middle seam open with a steam iron using a tailor’s ham, the edge of the ironing board, or something rounded to press the curved seam against. Repeat for second set.
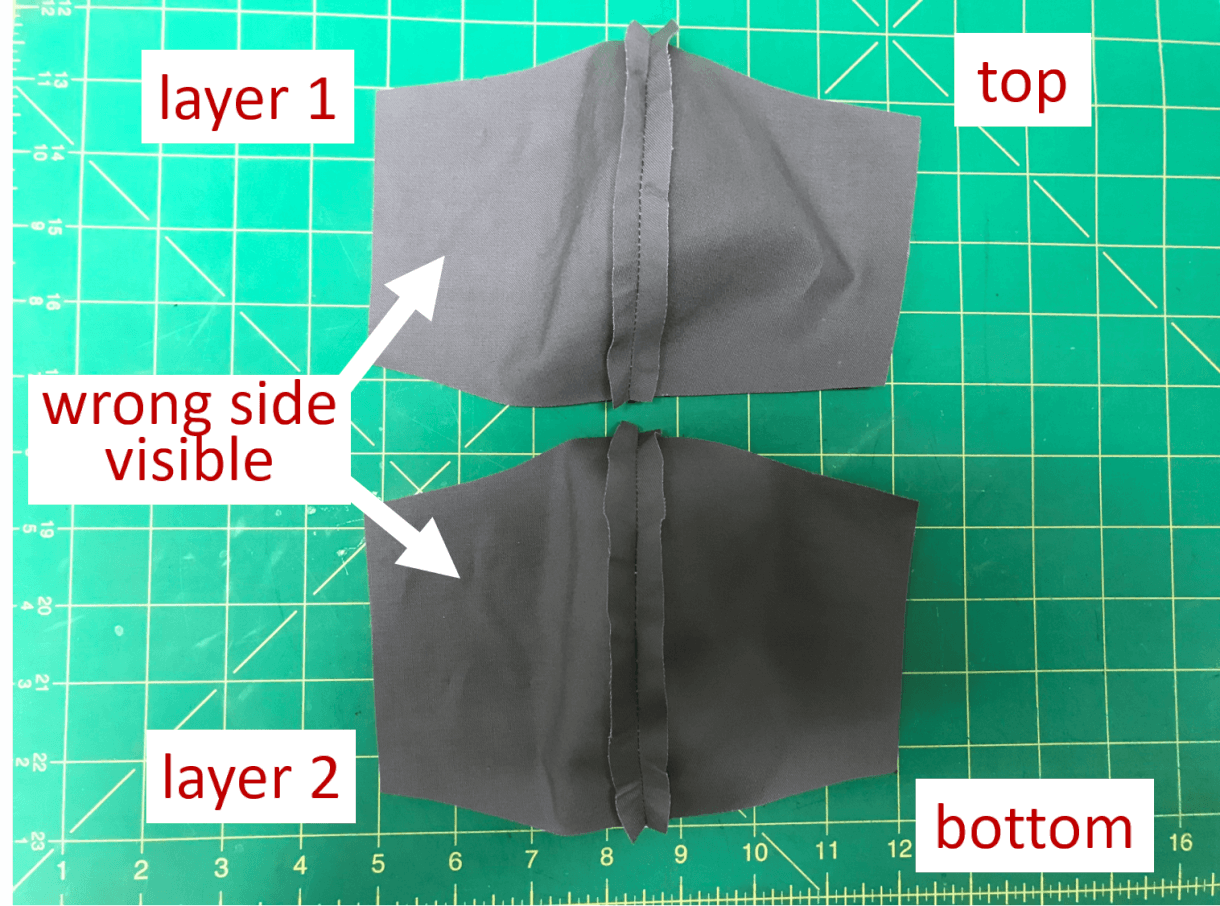
Image 4. Press the middle seam open using a rounded surface.
Step 5. Pin two layers, with good side of fabric facing inside, and wrong side of fabric facing out.
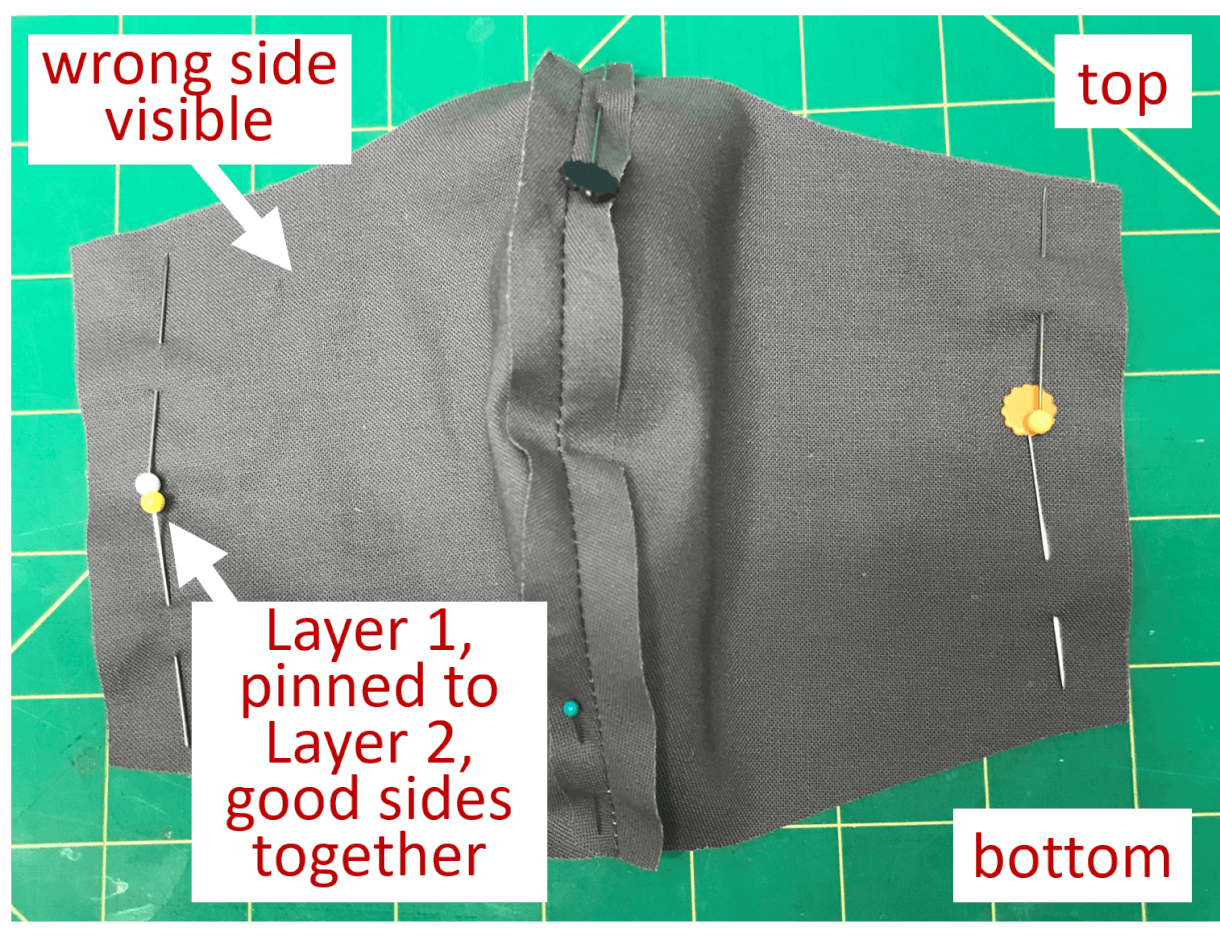
Image 5. Pin the two layers together, with wrong side of fabric facing out.
Step 6. Sew top and bottom seam 1/4” from edge, backtacking at start and finish. Do NOT sew a hem on left or right sides.
Step 6: Sew top and bottom seams 1/4″.
Step 7. Turn mask right side out and press top and bottom seams on a flat surface with a steam iron.
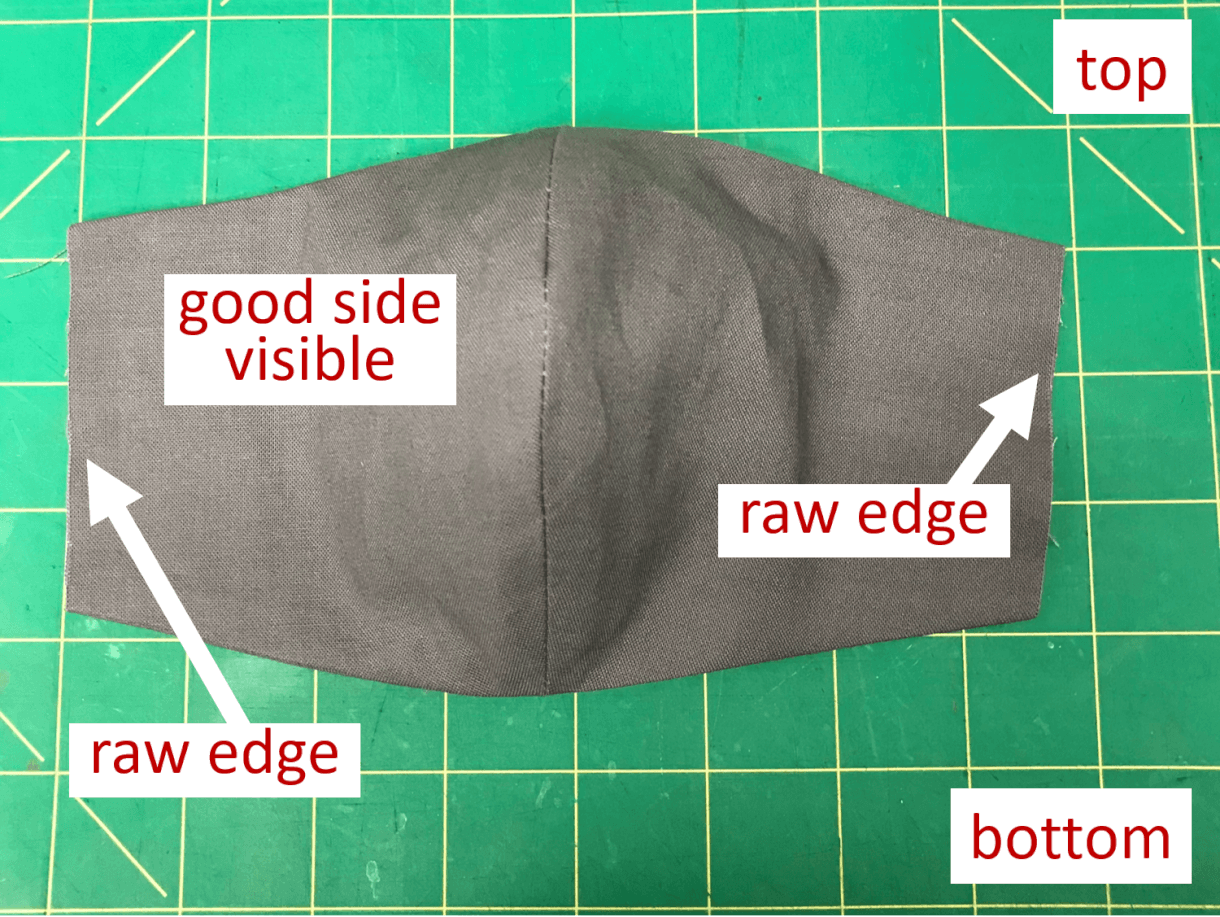
Image 7. Turn mask right side out and press with iron.
Step 8. Fold raw edges of left and right sides under ¼” and press.
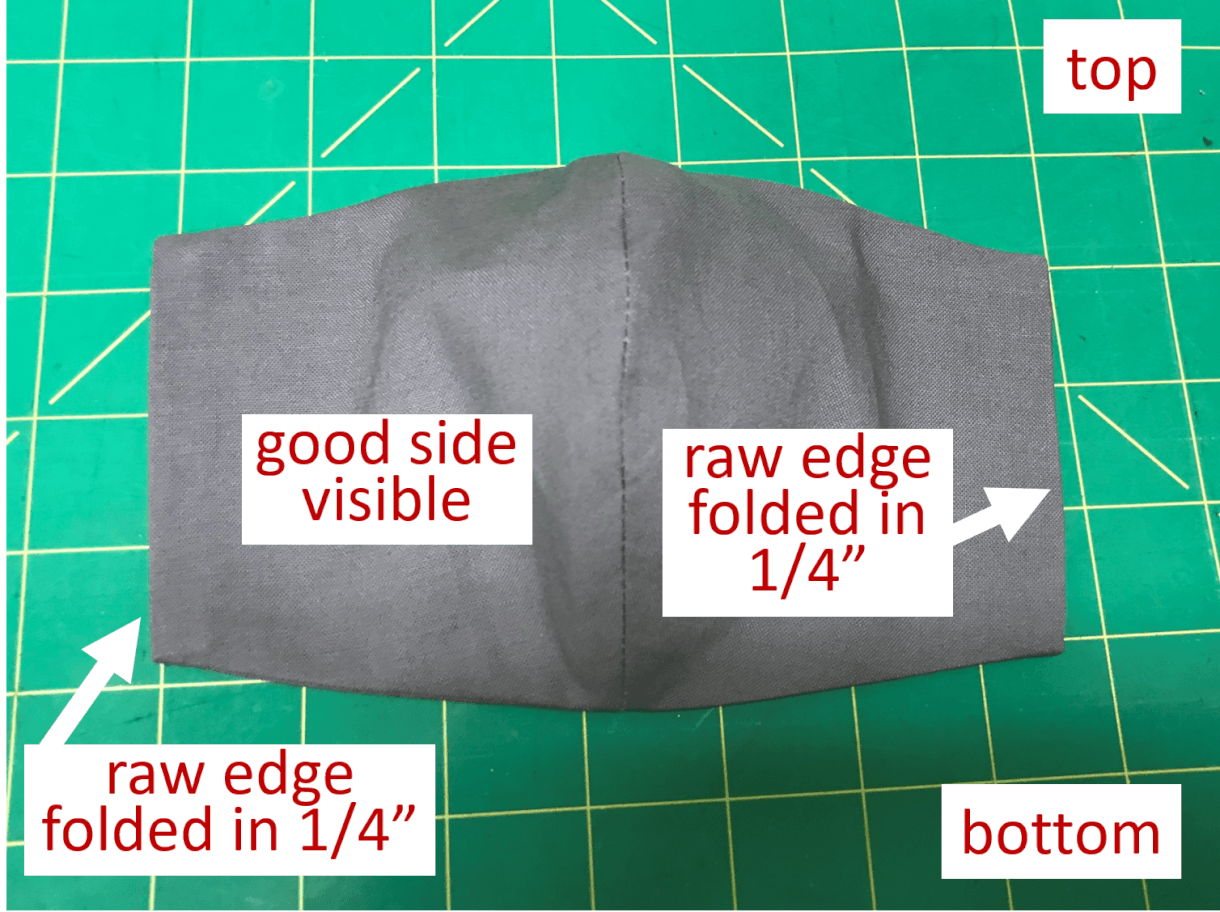
Image 8. Fold raw edges under ¼” and press.
Step 9. Pin elastic into open sides with about ½” on the inside. The longer elastic is the top one.
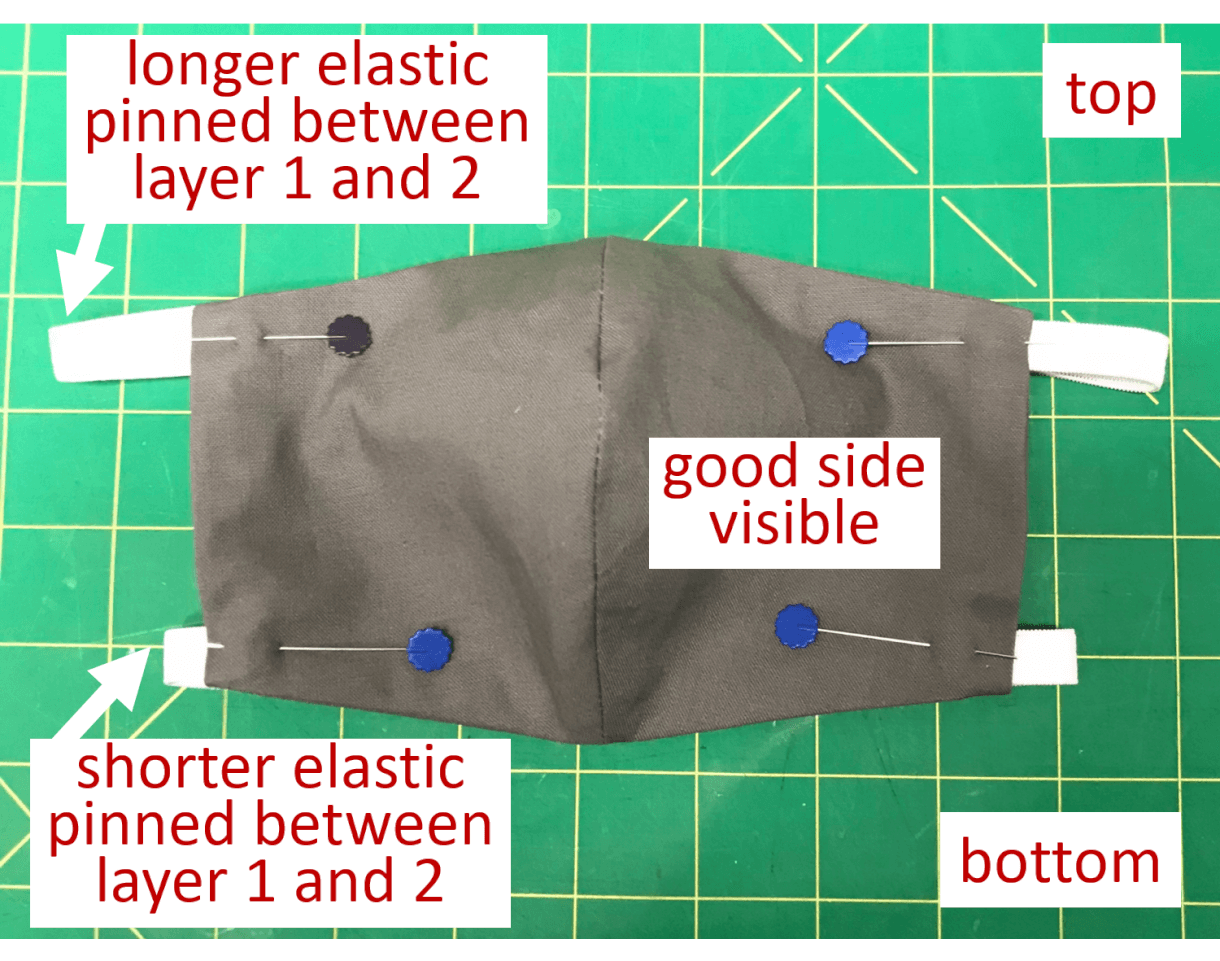
Image 9. Pin elastic into open sides with about 1/2” on the inside, with longer elastic on top.
Step 10. Topstitch both sides ¼” and 1/16” from open edge, backtacking at start and finish.
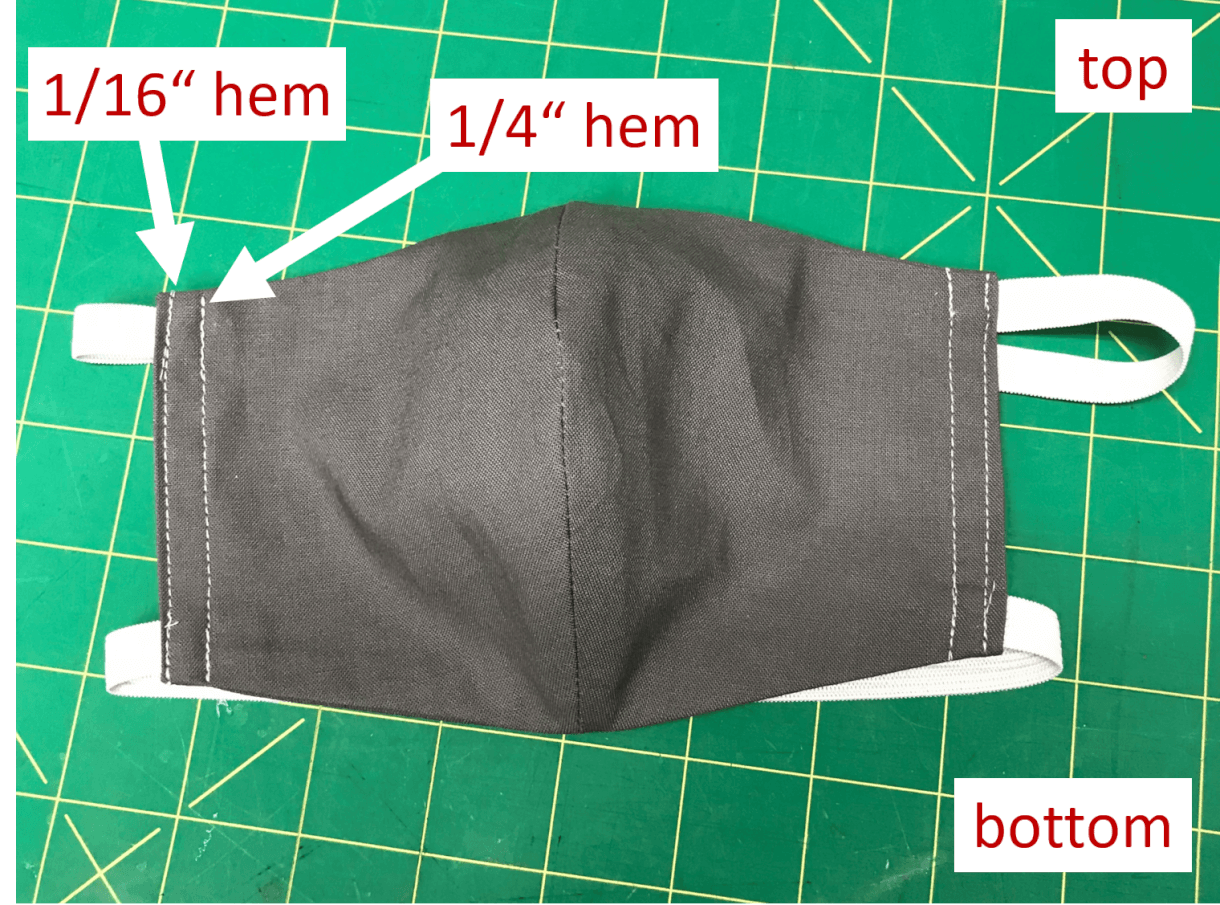
Image 10. Topstitch both sides 1/16” and 1/16” from open edge.
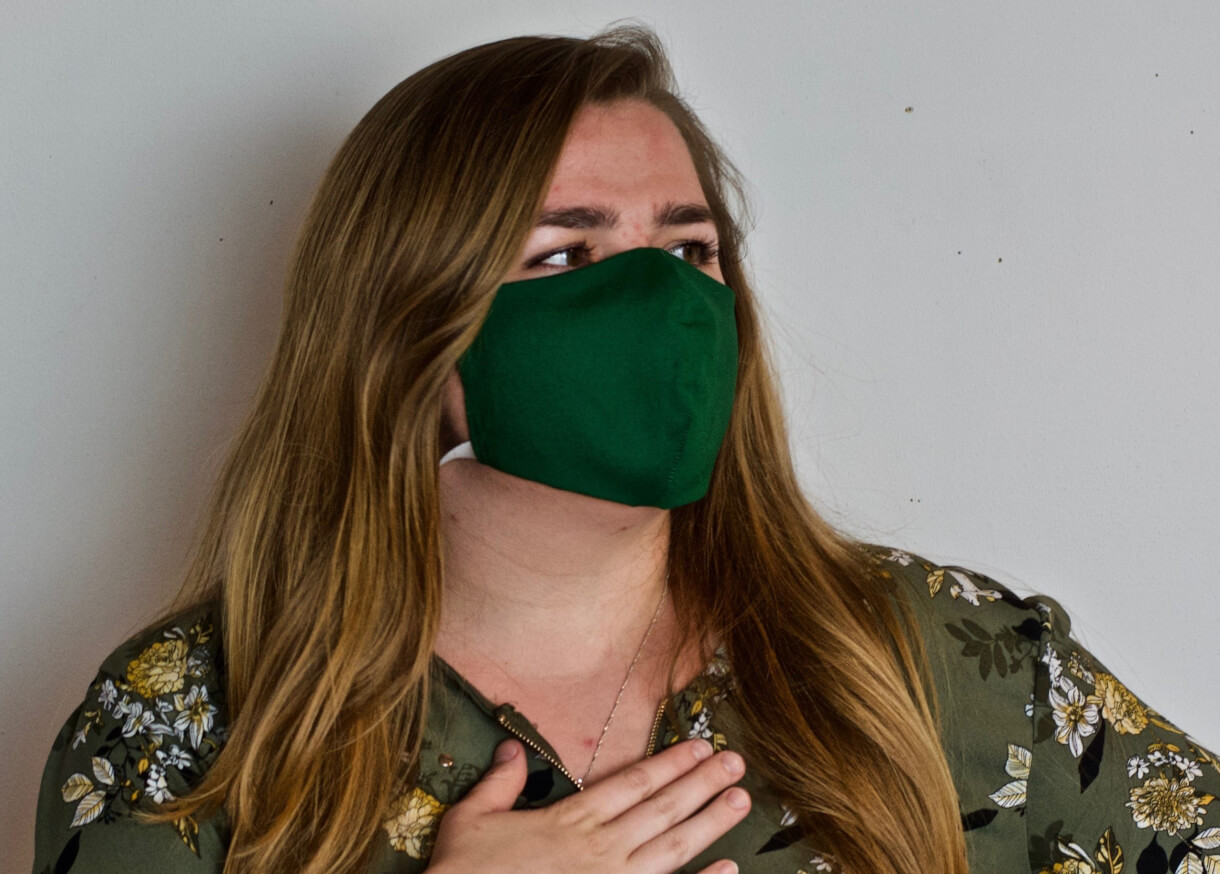
Step 11. Try on your super cool new mask! It’s finished!
Pleated face mask
We are making a fabric pocket mask with fabric ties. This face mask was designed by local sewer extraordinaire Jeni Falldine.
Disclaimer: These do not meet the medical standards for surgery, and are meant to be the best solution with off-the-shelf materials to create an effective viral barrier. We have consulted doctors and virologists, materials experts, and makers. We’ve reviewed many plans, produced 3 iterations and the 5-Layer Facemask is the best solution we’ve found, especially where replacement masks are scarce.
Update: Due to a shortage in elastic, and more information on the ideal masks for long-term use, we are changing the type of mask we recommend you sew. We are following the guidelines set forth by the Million Mask Mayday group on Facebook.
This will work great as a standalone 2-layer mask, and provide the option to insert additional barrier layers. Seattle Makers will be receiving 3-4 large boxes of non-woven fibers that we will cut into barriers for these masks and delivering alongside the masks to appropriate hospitals.
We will be providing kits for this mask at Seattle Makers. If you are interested in helping with this project you can pick one up and follow the instructions below. We also have sewing machines set up in a socially distanced, sterilized production area with mask and glove protection. Email jeremy@seattlemakers.org if you are available for sewing here at the makerspace or at home.
Donate
If you’re interested in donating sewn face mask to Seattle Makers so we can distribute them to the community and local health care professionals, all you need to do is:
- Follow the instructions below to make the masks
- Follow the steps to make your donation safe
- Drop off or mail your donation to the makerspace during our “open” hours: 1-7pm Monday, Thursday, and Saturday
Update on 05.12.20: We’ve been giving out a lot of shields to people who don’t have masks but to get the most protection, you really need both. Our demand is outpacing our ability to produce sewn masks. We are working with Crafters Against Covid-19 to acquire hundreds of masks, but we need more. We are willing to pay $5 per mask if you’re able to sew them at home. To be paid for your sewn mask donations, follow the three steps above AND include a piece of paper in your donation bag with the following information:
- Name
- Phone Number
- Number of masks sewn
- Amount requested (up to $5 per mask)
- Paypal email address (If you don’t use Paypal, let us know and we can work something else out.)
Finally, send a Paypal money request with the same information listed above to accounting@seattlemakers.org. If you have any questions, email our volunteer coordinator, Dimitri Hunter.
Supplies
Note: Some fabric stores in our area (Seattle) are closing for 2 weeks effective immediately, so buy materials now if you are still able. Please let us know if you have extra materials, we will be distributing kits to as many people as possible.

- 100% Cotton, tightly woven (this is important)
- 1 x Rectangle 8”x15”
- 4 x Strips 2”x 20” EDIT: We now recommend sewing 20″ straps to fit all sizes of heads.
- OPTIONAL: Wire – 18-20 guage soft wire for close fit around nose (NOT recommended for health care professionals working around MRI machines or other machines that are sensitive to metal)
- Scissors
- Pins
- OPTIONAL: Wire Cutter
- Sewing machine
Assembly
Making the fabric ties
Step 1. Start with a 2” wide strip (shown in Image 1) and iron it flat with the outer fabric (pretty side) down.
Step 2. Fold the two raw edges in to meet in the middle, making a 1” wide strip. Then fold in half again to make a ½” wide strip. All the raw edges will be folded to the inside (Image 2).
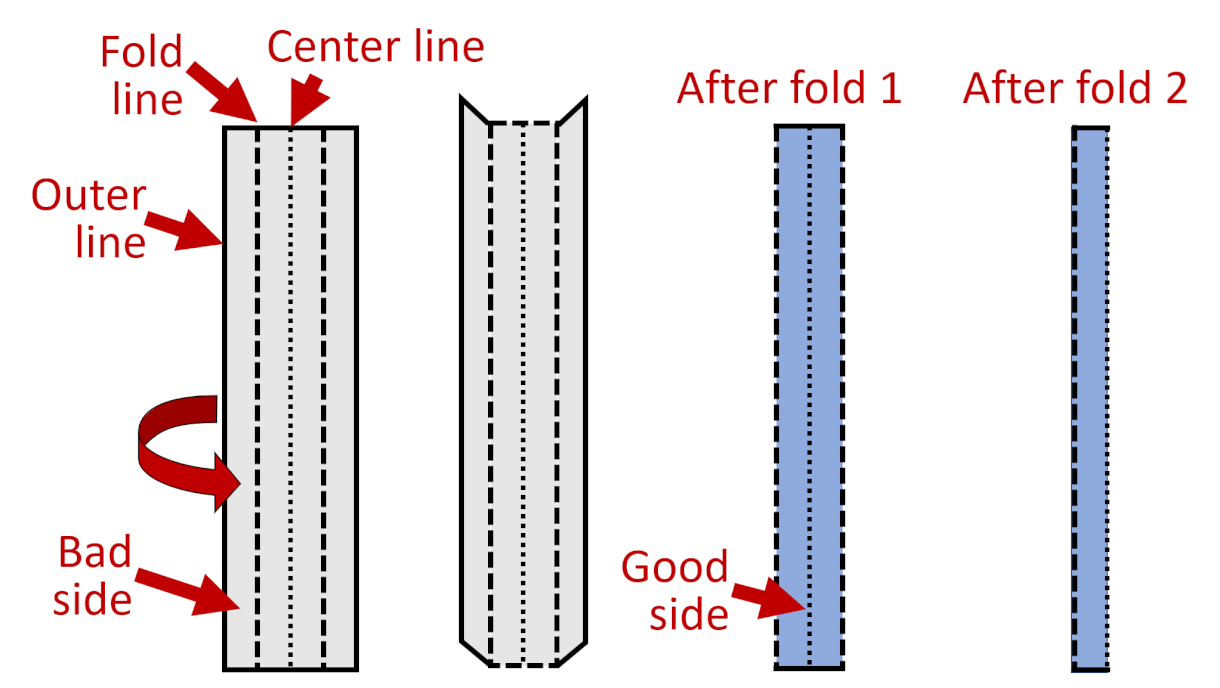
Image 2 – after folding, all the raw edges will be folded to the inside.
Step 3. Stitch the open side closed 1/8″ to 1/16″ from the edge (Image 3)
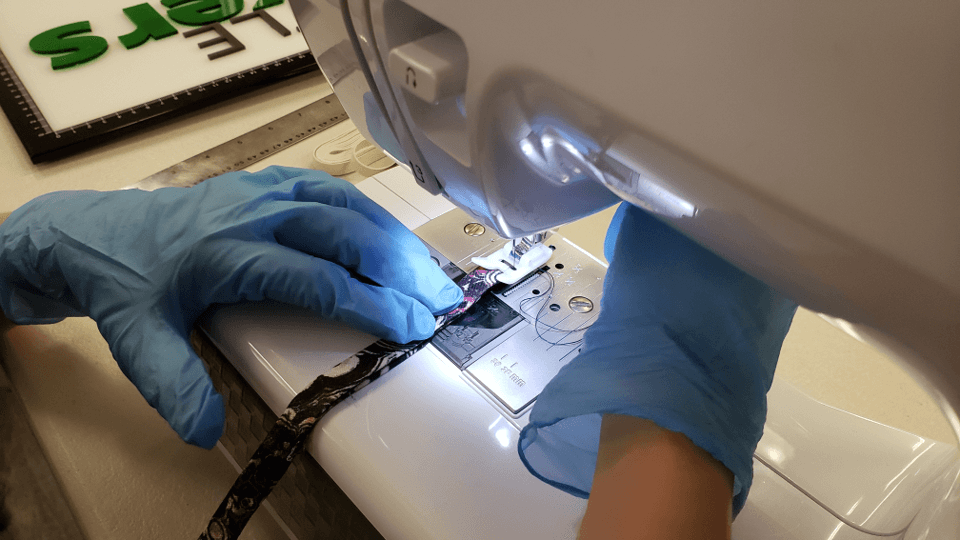
Image 3 – Stitch the open side closed 1/8” to 1/16” from the edge.
Making the Mask
Step 4. Take the large 8″ x 15″ piece of fabric, and finish the opening of the pocket with a 1/4” rolled hem. First fold the top edge down 1/4″ and press it. Then fold the folded edge down 1/4″ again and press it (Image 4).
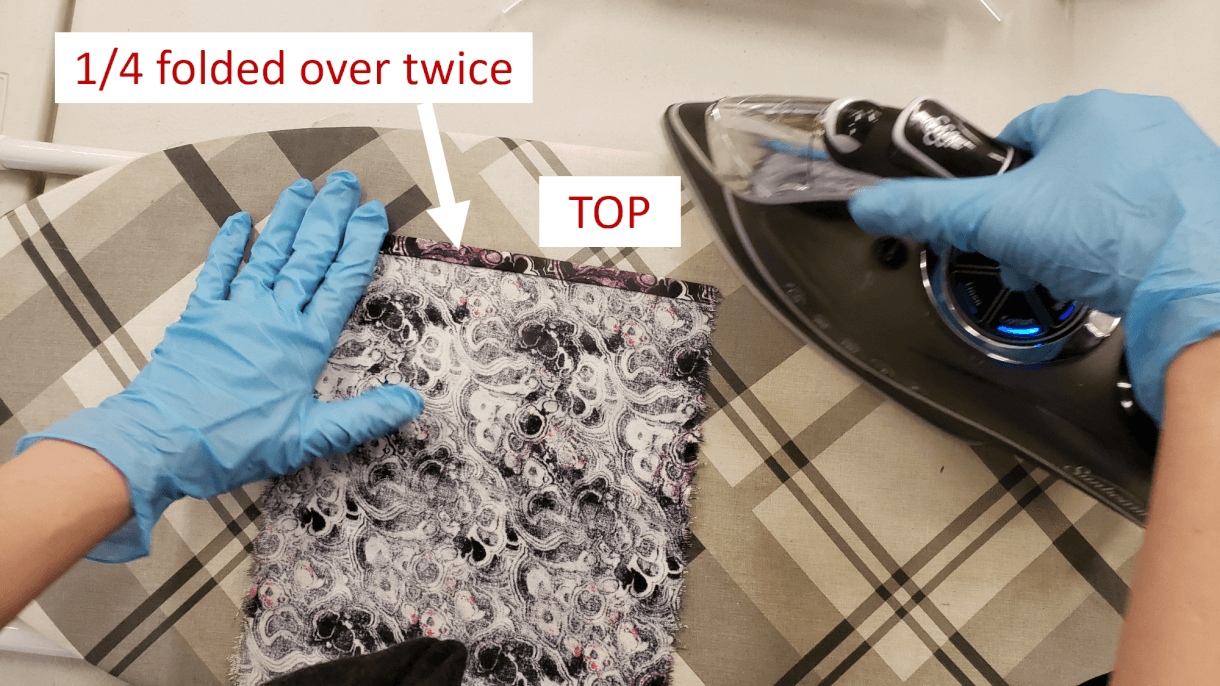
Image 4 – 1/4″ rolled hem being ironed.
Step 5. Sew the top edge shut (Image 5)
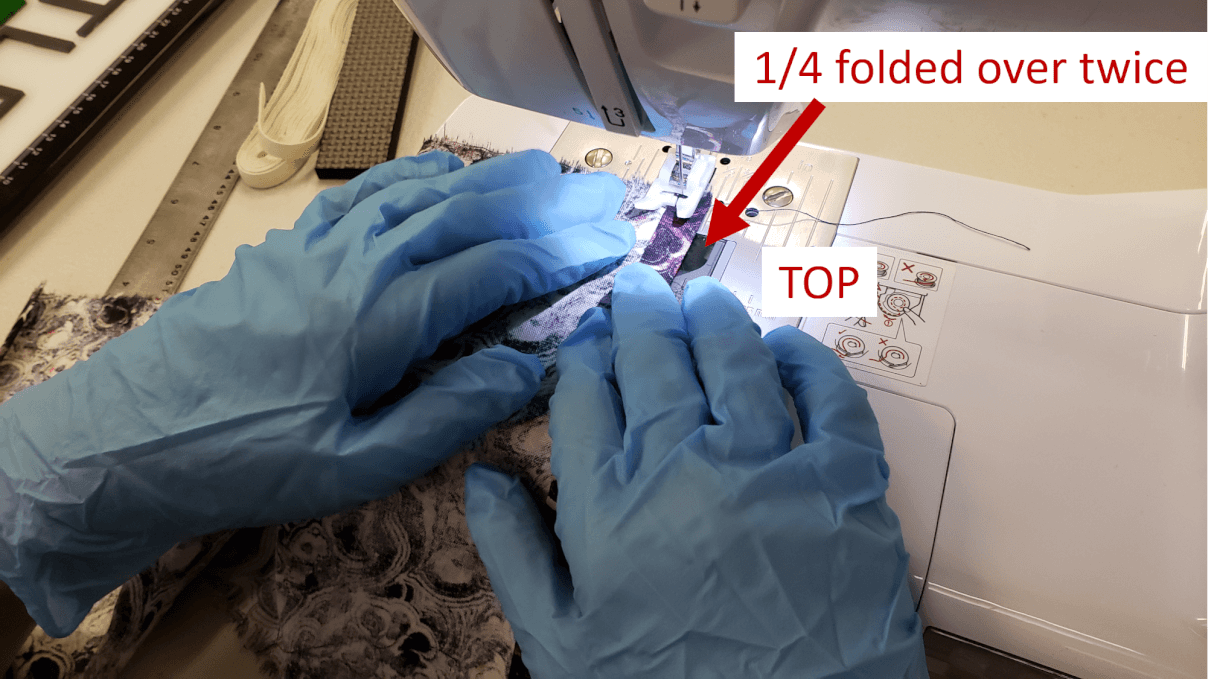
Image 5 – Sewing the top edge shut.
Step 6. Repeat this process with the bottom edge (Image 6).
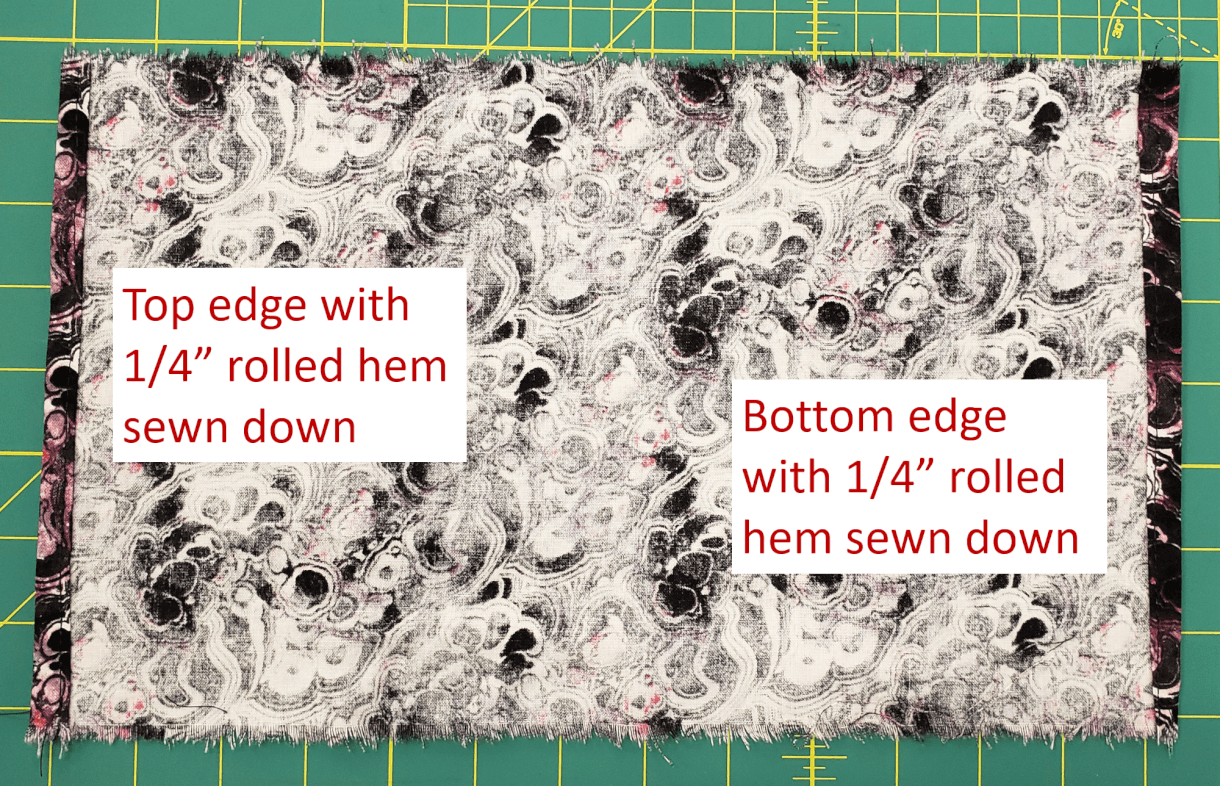
Image 6 – 1/4″ rolled hem on the bottom edge.
Attaching the top ties
Step 7. Attach the left top tie to the outside face of the fabric (the pretty side). You will pin one end near the raw edge leaving the free end of the tie toward the center, about 1 1/4″ inches from the top hem (Image 7). Repeat for the right top tie.
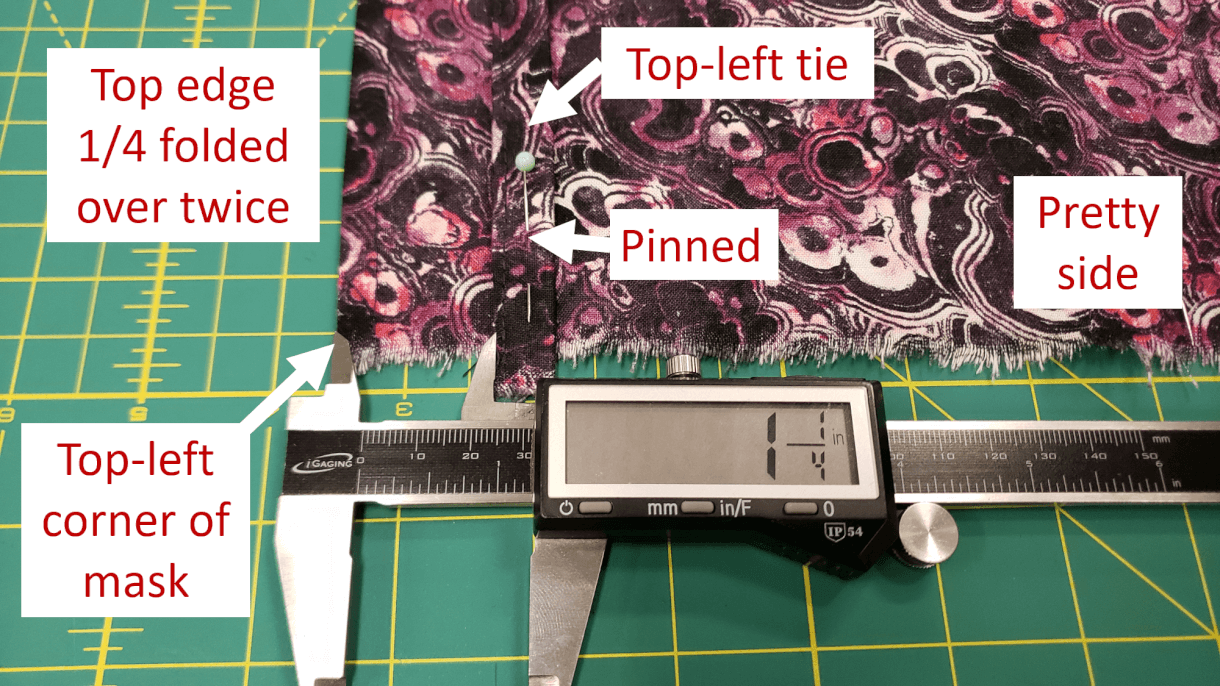
Image 7 – Pinning the top left tie to the outside face of the fabric, about 1 1/4″ from the top hem.
Step 8. Pin the bottom left tie 6.5 inches from the bottom of the fabric in the same fashion as in Step 7, the majority of the tie towards the inside (Image 8).
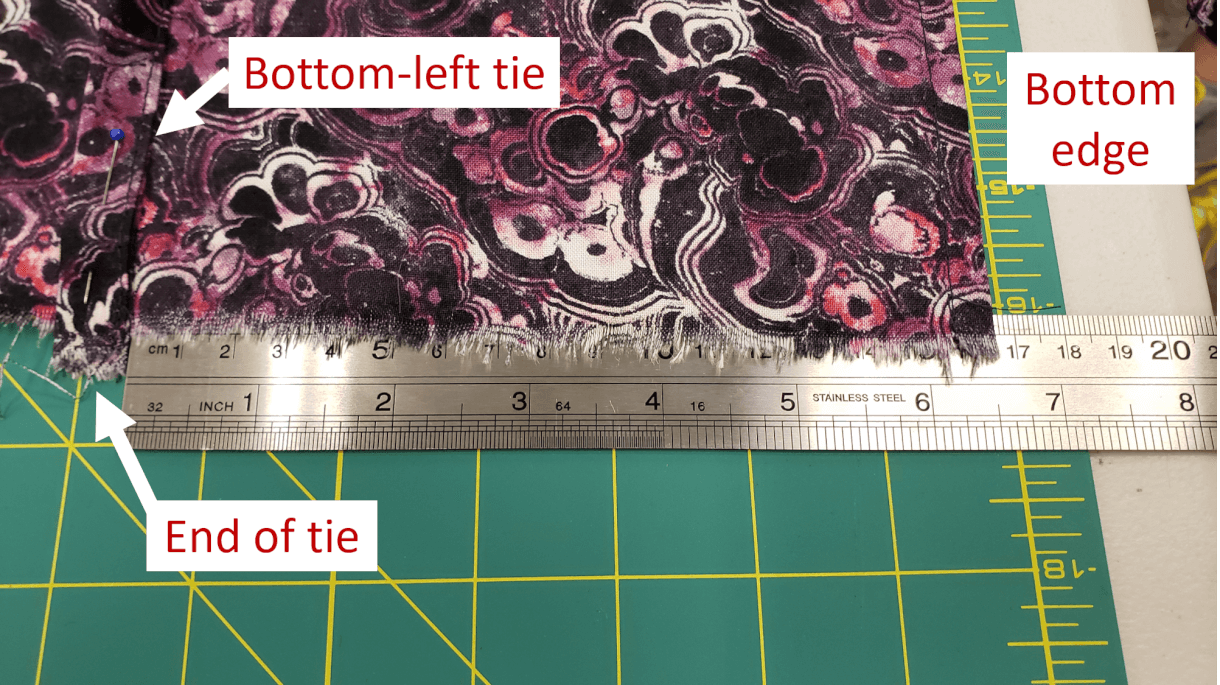
Image 8 – Pinning the bottom left tie 6.5 inches from the bottom of the fabric.
Step 9. Once all your ties are pinned, tack them in place 1/16” from the raw edge with your sewing machine, and remove the pins (Image 9).
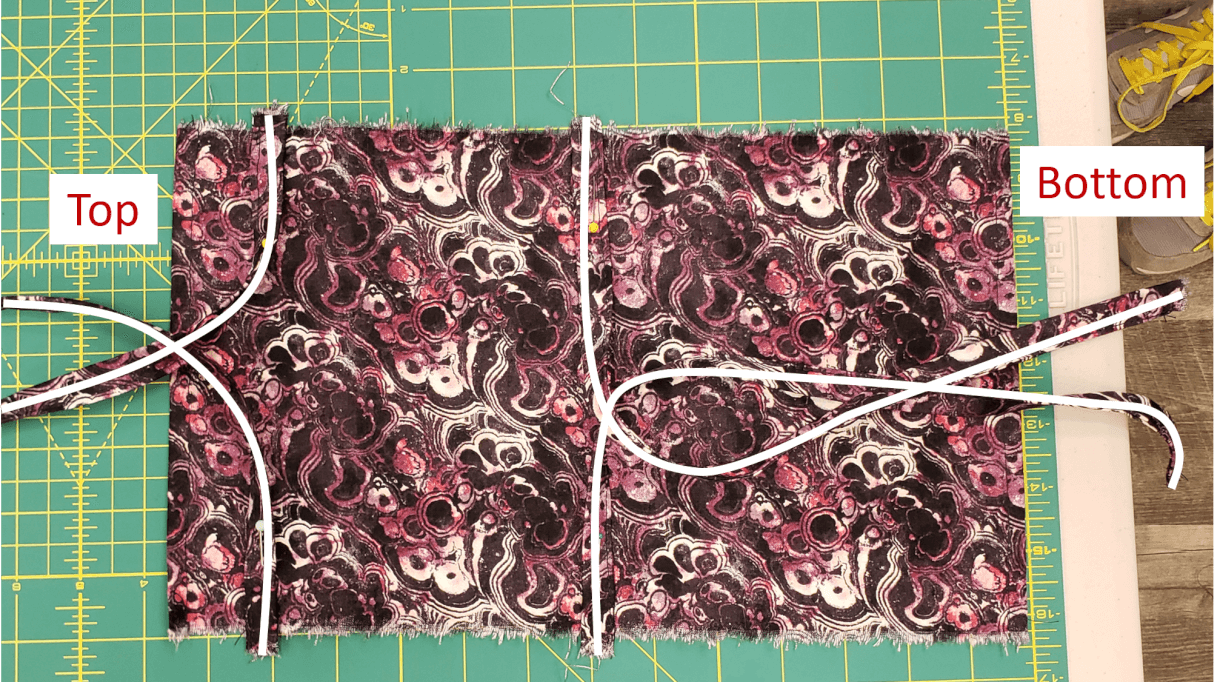
Image 9 – Ties pinned in place then tacked in place 1/16′ from the raw edge (we’ve added white lines to this picture in post-production to make the ties easier to see – this white line is not actually on the fabric). The pins have been removed.
Step 10. Arrange your ties in a neat bundle in the middle of your mask, so you when you sew up the sides they don’t get caught in the seam (Image 10).
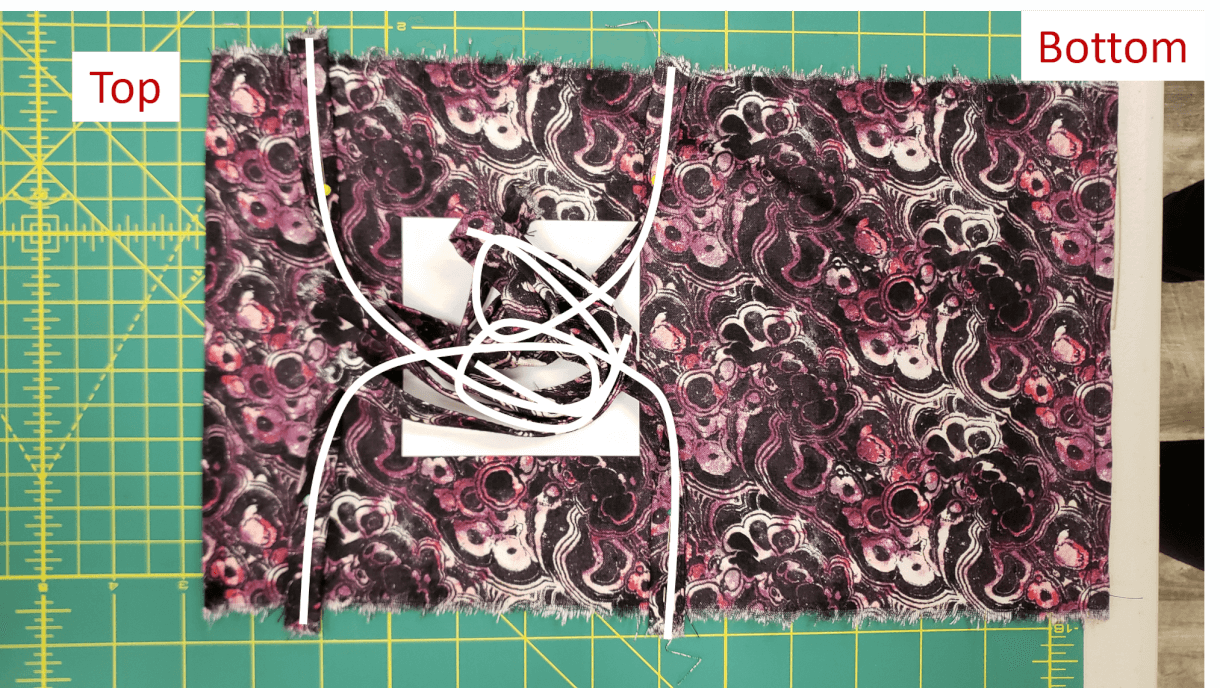
Image 10 – Ties arranged in the middle of the mask (we’ve added a white lines to this picture in post-production to make the ties easier to see – this white line is not actually on the fabric. A piece of white paper was also placed in this photo to make the ties more visible. This paper was removed before sewing.)
Step 11. Fold the top hem down 1” (Image 11).
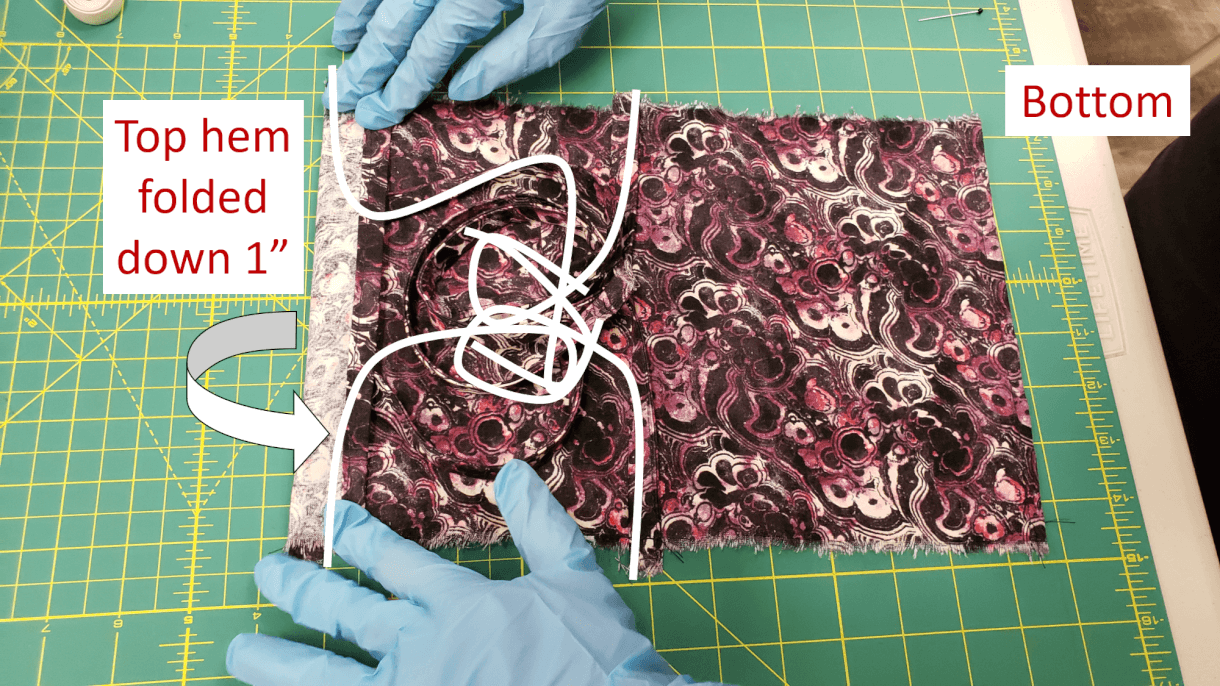
Image 11 – The top hem folded down 1”.
Step 12. Fold the bottom hem up to overlap the top hem (Image 12). We aligned the bottom rolled hem with the top rolled hem.
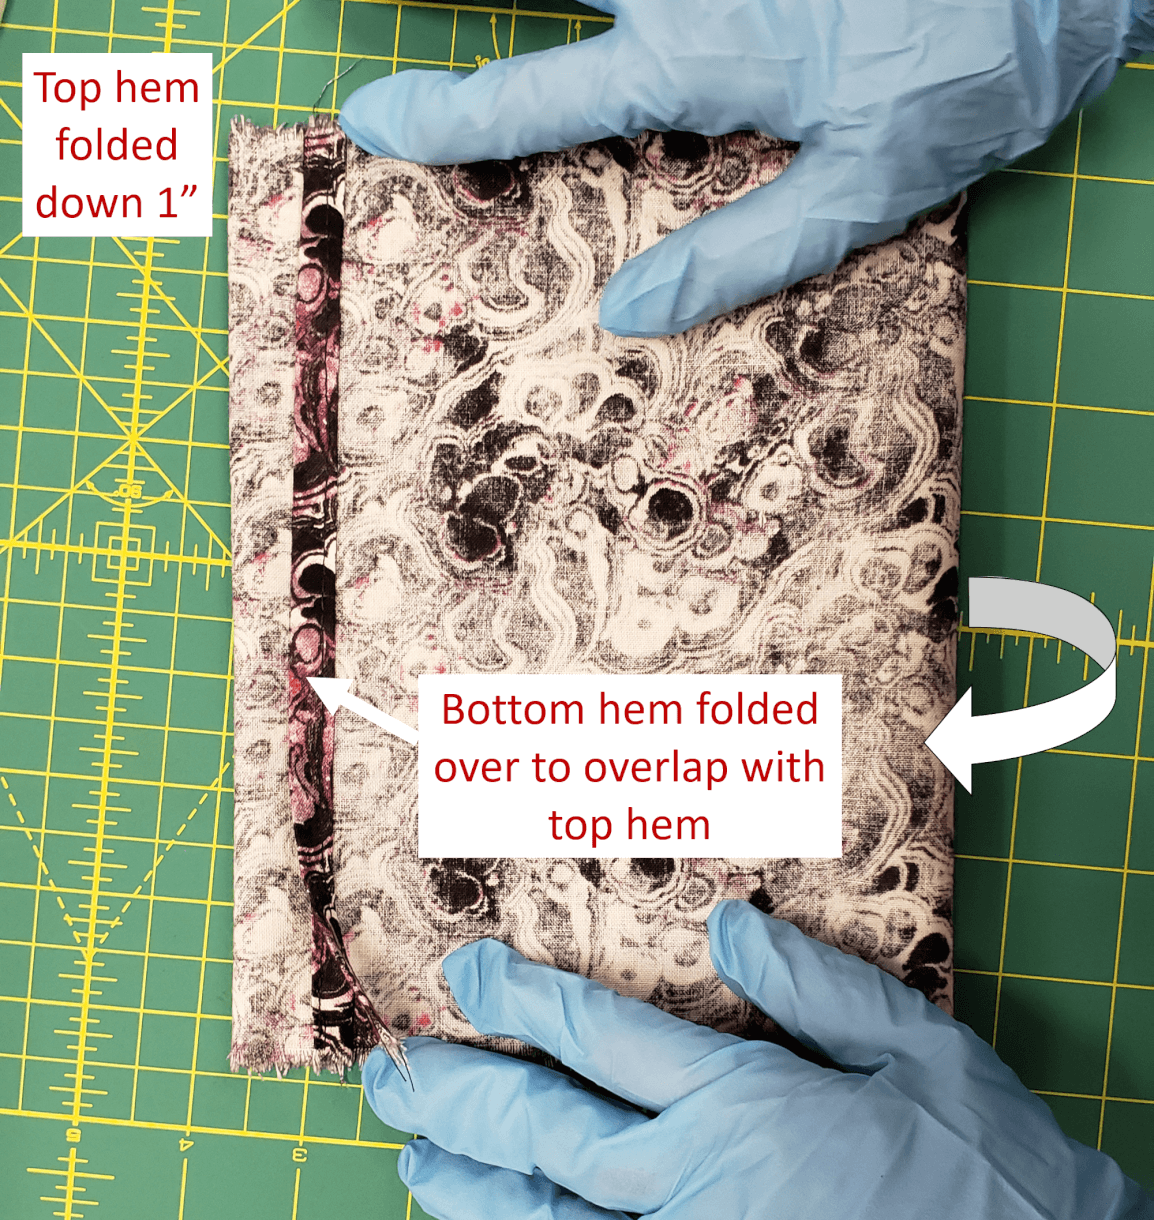
Image 12 – The bottom hem is folded over to overlap with the top hem.
Step 13. Place pins in the four corners to hold the shape in place: two where the hems overlap, and two near the bottom fold.
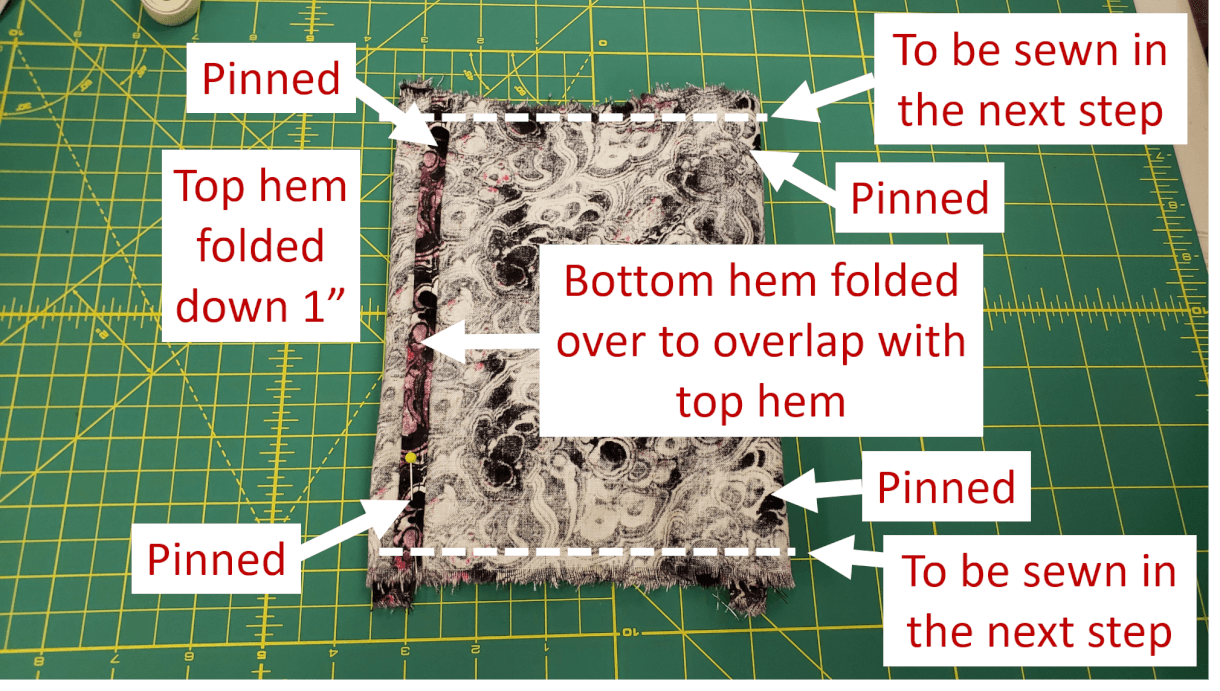
Image 13 – Location of pins: two where the hems overlap, and two near the bottom fold. Dashed line indicates where you will sew in the next step.
Step 14. Sew up the side seams, making sure the ties stay out of the way (Image 14).
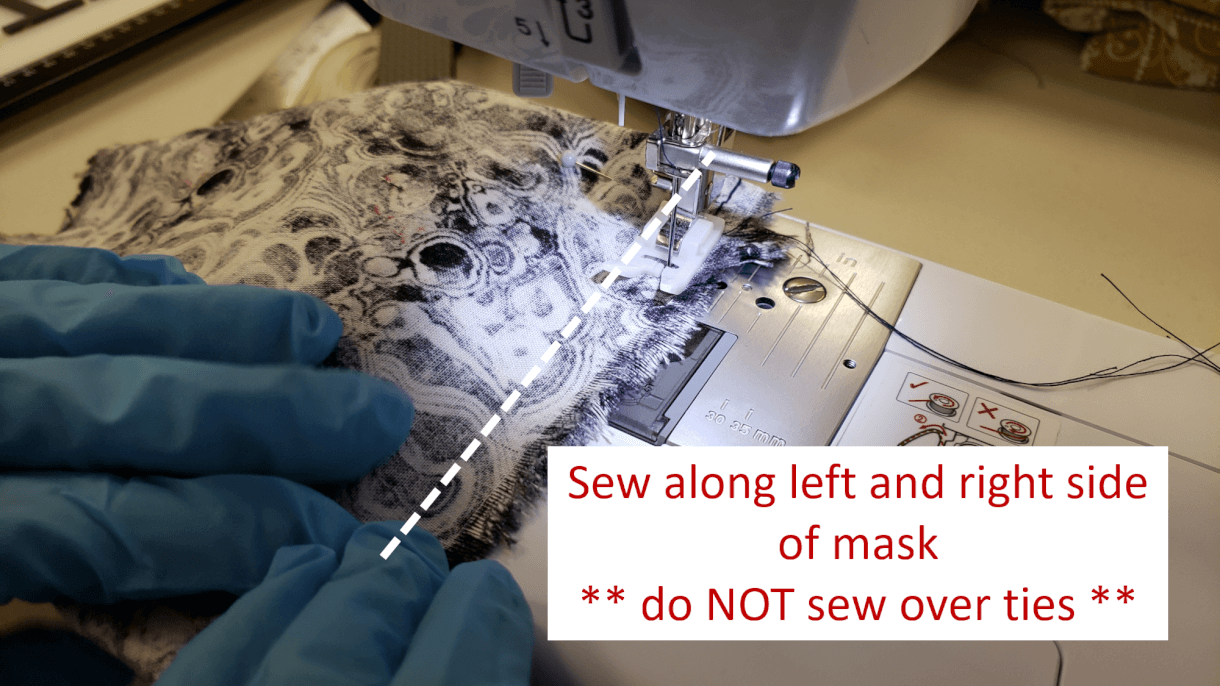
Image 14 – Sewing along the sides of the mask (as indicated by the dashed line in Image 13).
Step 15. Remove the pins. The sides will be sewn but there is an open slot at the top of the mask that will allow you to turn it right side out in the next step (Image 15).
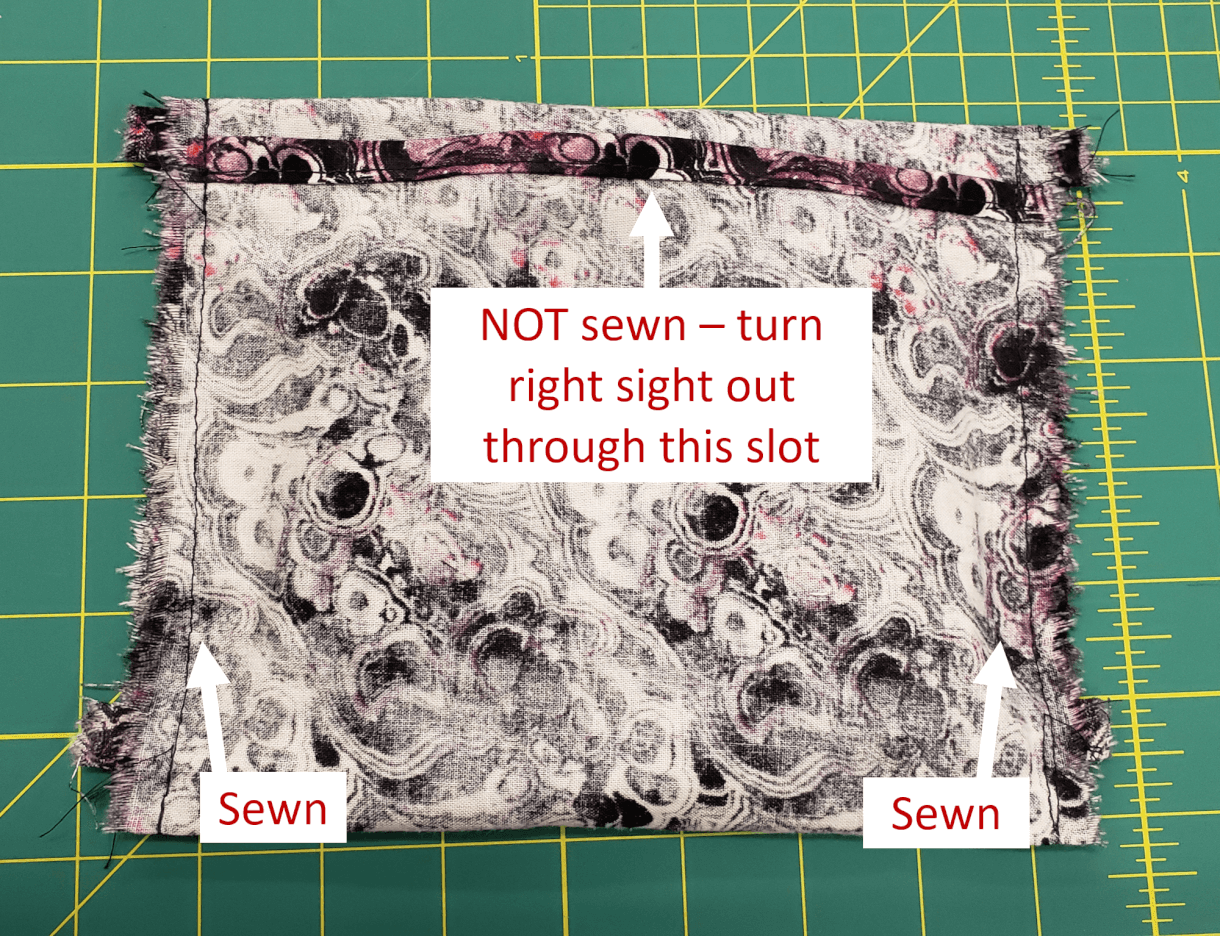
Image 15 – Pins removed after sides are sewn. Note, this image is rotated compared to the previous images.
Step 16. Turn the mask right-side out through the opening slot shown in Image 15. You may need to poke a pen or scissors into the corners to push them all the way out (Image 16).
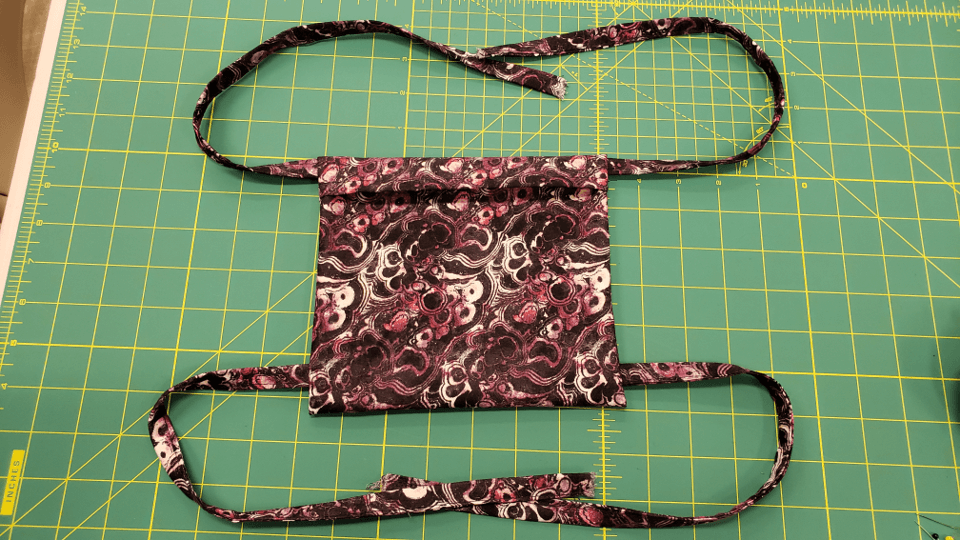
Image 16 – The mask turned right side out.
OPTIONAL: ADDING THE NOSE BRIDGE WIRE
Note: this section is optional. Wire should NOT be used in face masks for health care professionals who work around MRI machines or other machines that are sensitive to metal. If you don’t want to add the wire, skip this section and jump to Finishing the Edges and continue with Step 22.
Step 17. Cut a 3.25” section of wire for the nose bridge (Image 17).
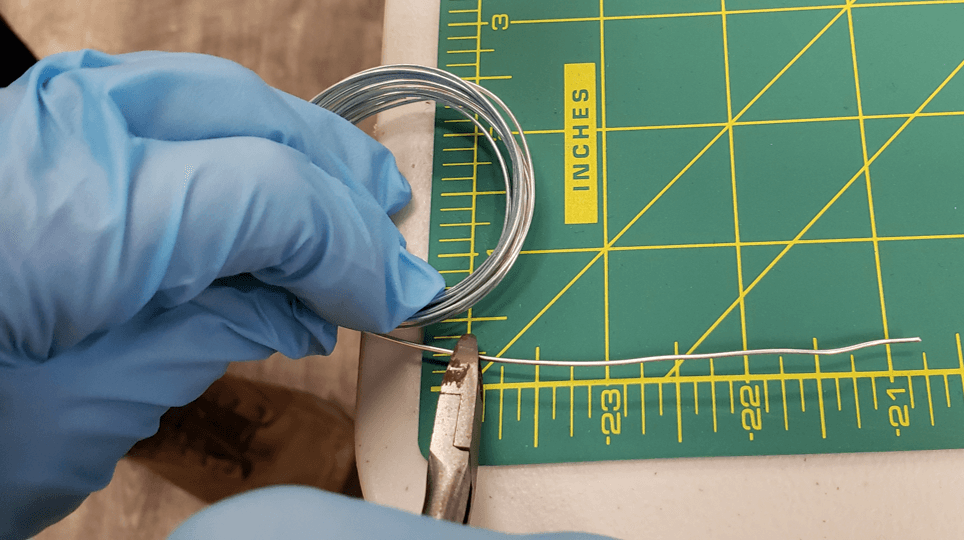
Image 17 – Cutting 3.25″ of wire.
Step 18. Set the cut section of wire centered on the top, near the fold, and mark the left and right sides with pins (Image 18).
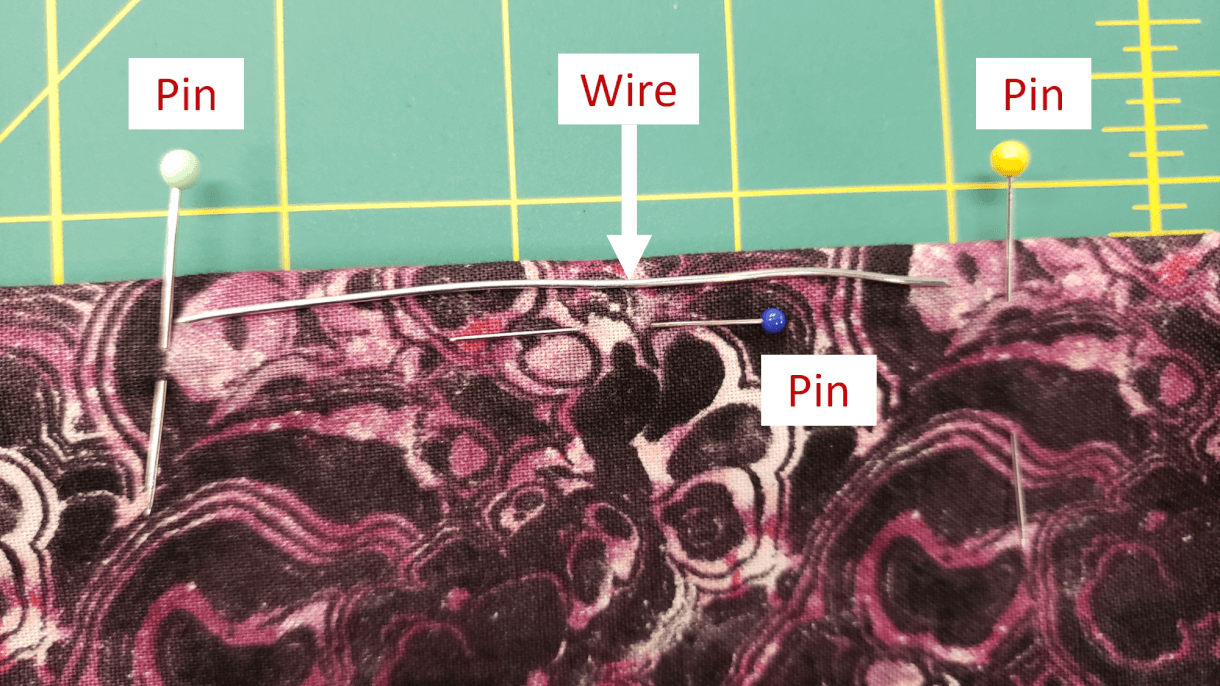
Image 18 – Placement of the wire near the top fold of the mask, marked with pins.
Step 19. Place the wire inside the fold (Video 19).
Video 19. How to insert the nose wire.
Step 20. Stitch closely around the wire to create a pocket. Make sure to back-tack several times to keep the wire in place (Image 20.
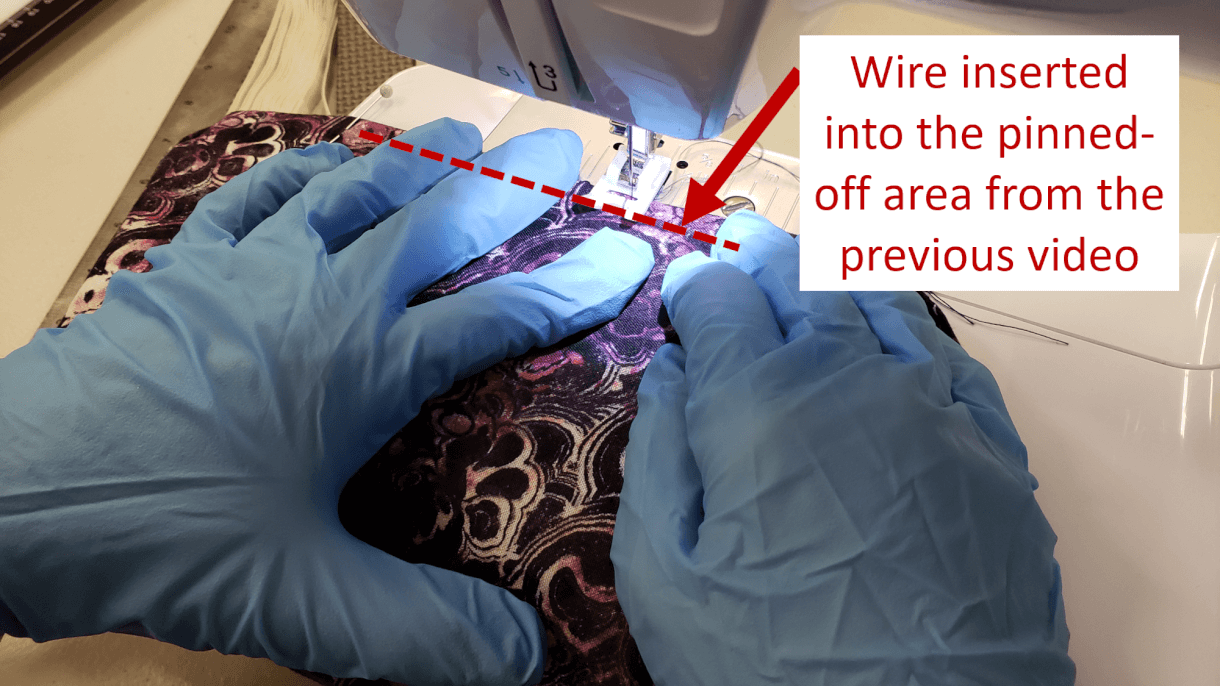
Image 20 – Sewing around the wire to create a pocket. The dotted line indicates where the wire is inside the pocket (as demonstrated in Video 19). The wire will NOT be visible during this step.
Step 21. Look! It’s a wire in a pocket! (Image 21).
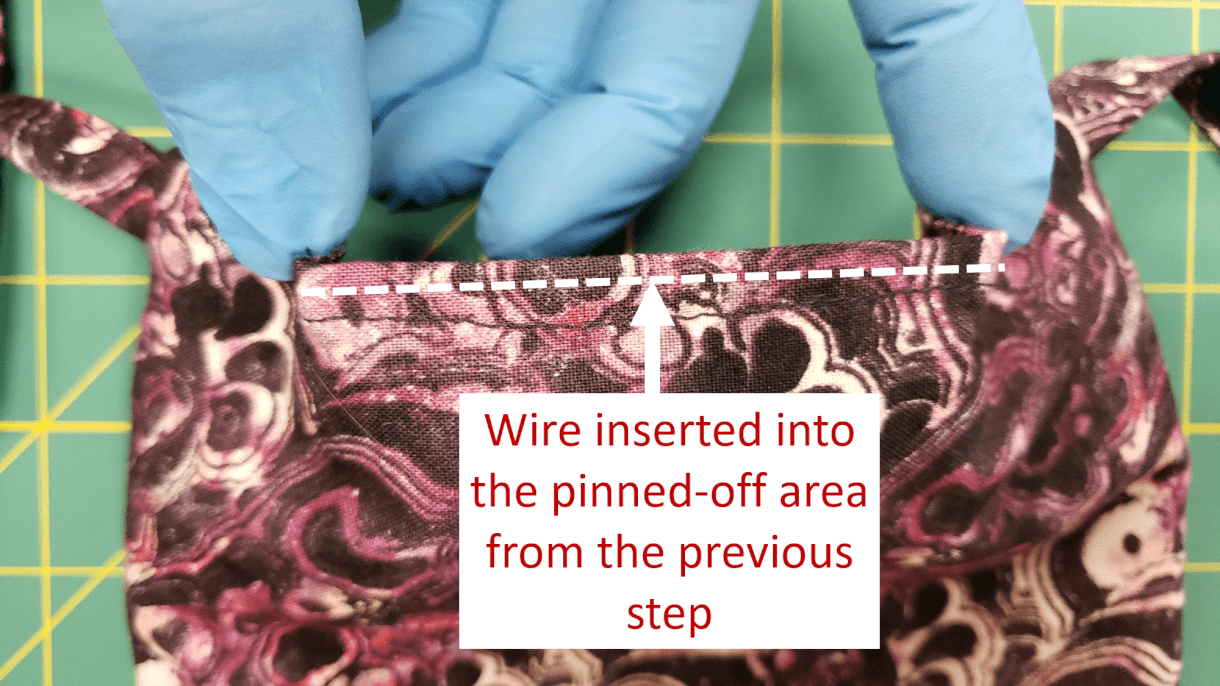
Image 21 – The wire is now sewn inside a pocket in the top edge of the mask. The dashed line shows where it is inside the pocket. It will NOT be visible from the outside of the mask.
Finishing the edges
Step 22. Press the edges with a steam iron, and top stitch closely (1/8″ to 1/16″) around the entire perimeter, going over the side seams twice (Images 22a and 22b)
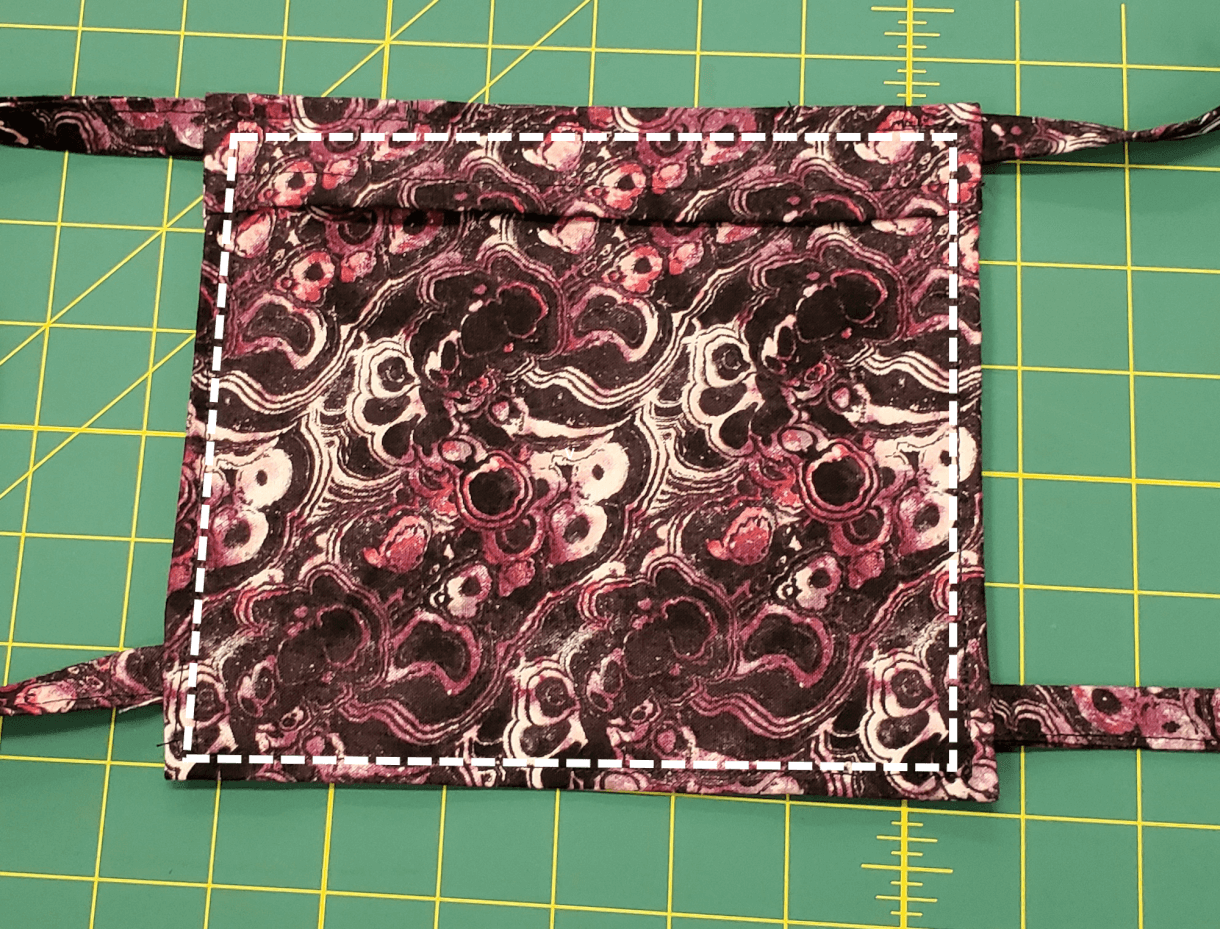
Image 22a – Dashed line shows where you will be sewing around the perimeter of the face mask – 1/8″ to 1/16″ from the edge.
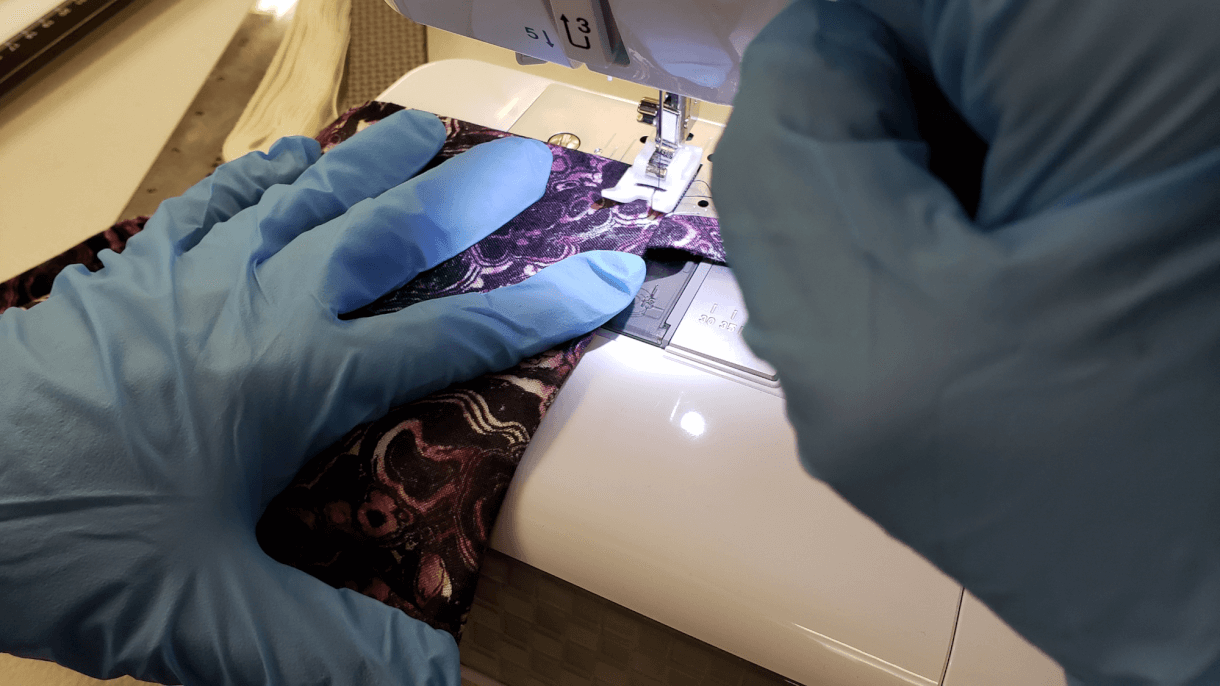
Image 22b – Sewing around the perimeter of the face mask, 1/8″ to 1/16″ from the edge.
Step 23. You’ve got a smart looking mask (Image 23)! You could add 4 more ties at this point and it would really look like a squid. Resist that urge.
Image 23 – The mask with the edges sewn.
Adding 3 pleats
Each pleat will be 1/4″ to 1/2″ in depth, so the finished mask is about 4” in height.
Step 24. Start your first fold as close to the bottom tie as you can. You want your pleats closer to the bottom than the top. There is some room for variability here. You can see where we placed each pleat in Image 24.
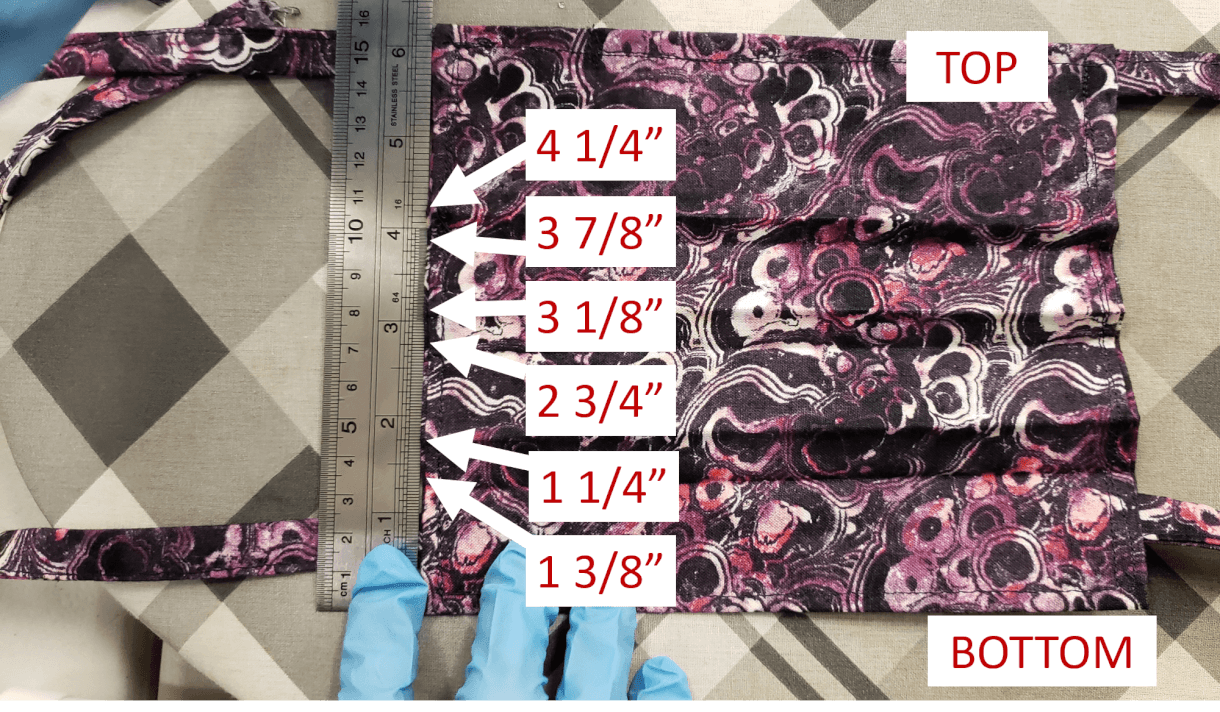
Image 24 – Location of all the pleat folds in the mask.
Step 25. After each fold, press with the iron (Image 25).
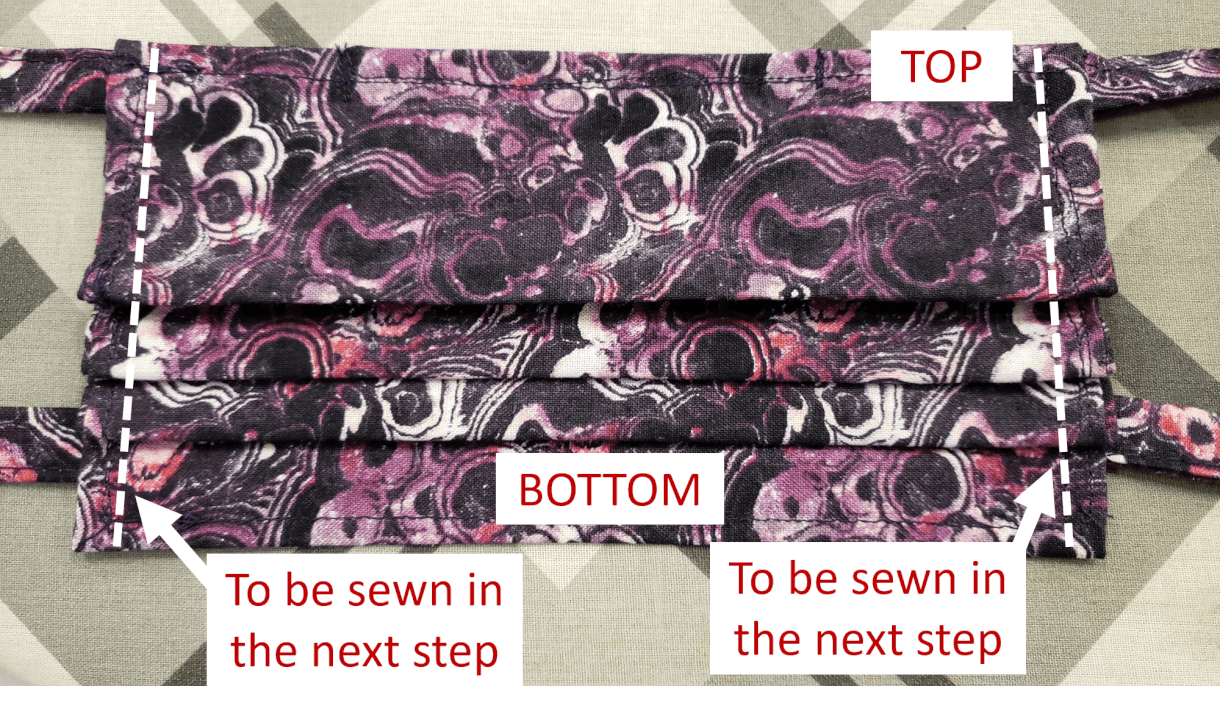
Image 25 – The mask after the pleats are ironed. The dashed lines are where you will top stitch the sides in Step 26.
Step 26. Top stitch the sides again to tack down the pleats.
Image 26 – Top stitching the sides (shown as dashed lines in Image 25) to tack down the pleats.
Finish the tie ends
Step 27. Fold the end of one tie over twice (Image 27), and press. Repeat for all four ties.
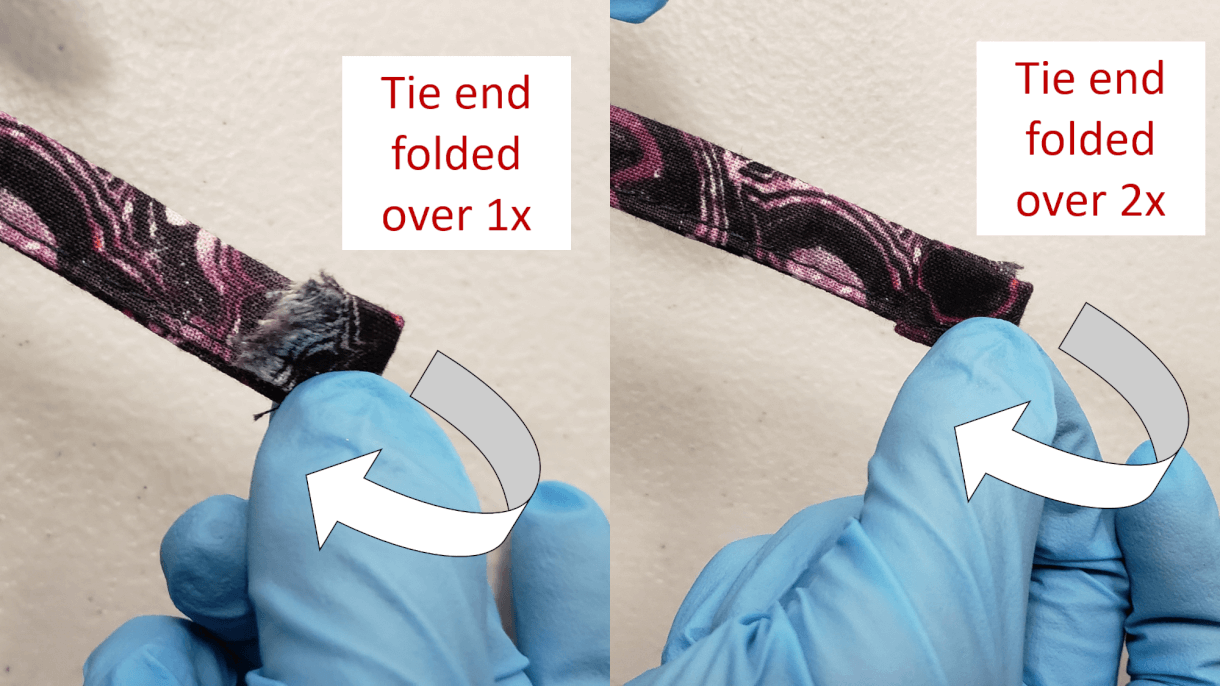
Image 27 – Folding over the end of a tie twice.
Step 28. Topstitch about 1/8″ from the edge of the tie to finish (Image 28).
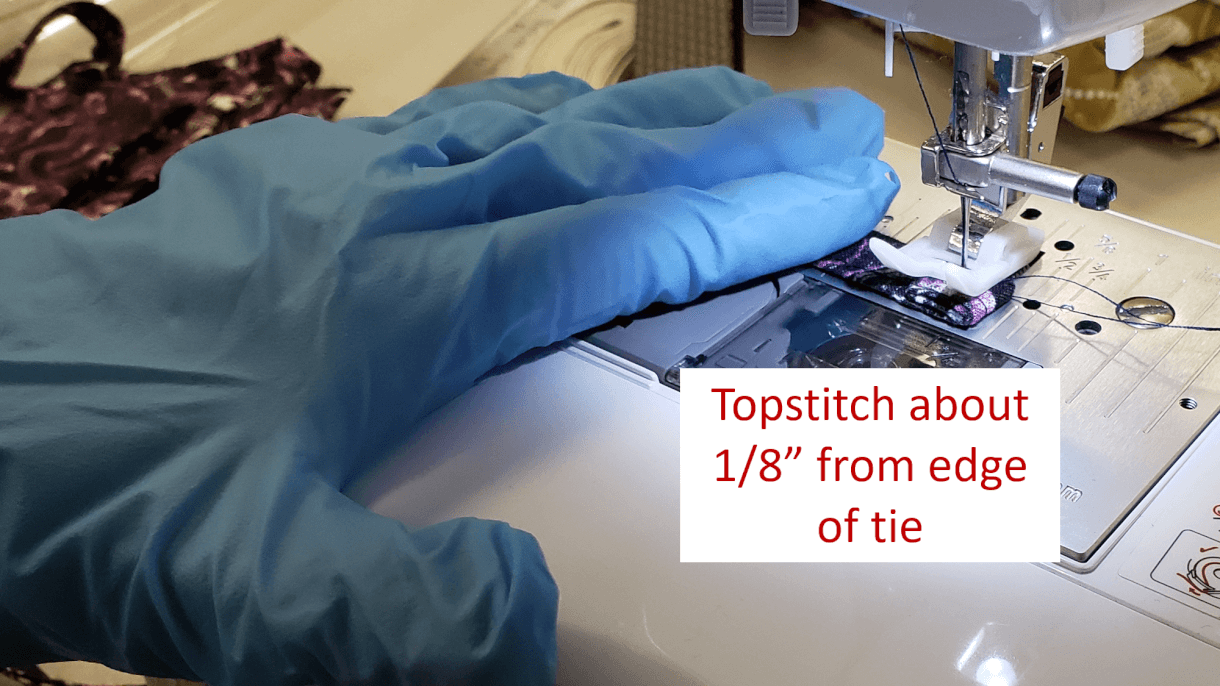
Image 28 – Top stitching the end of the tie about 1/8″ from the edge.
Step 29. If you have non-woven material like coffee filters or paper towels, insert 2-3 layers in your face mask to add extra air-borne disease protection (Image 29)
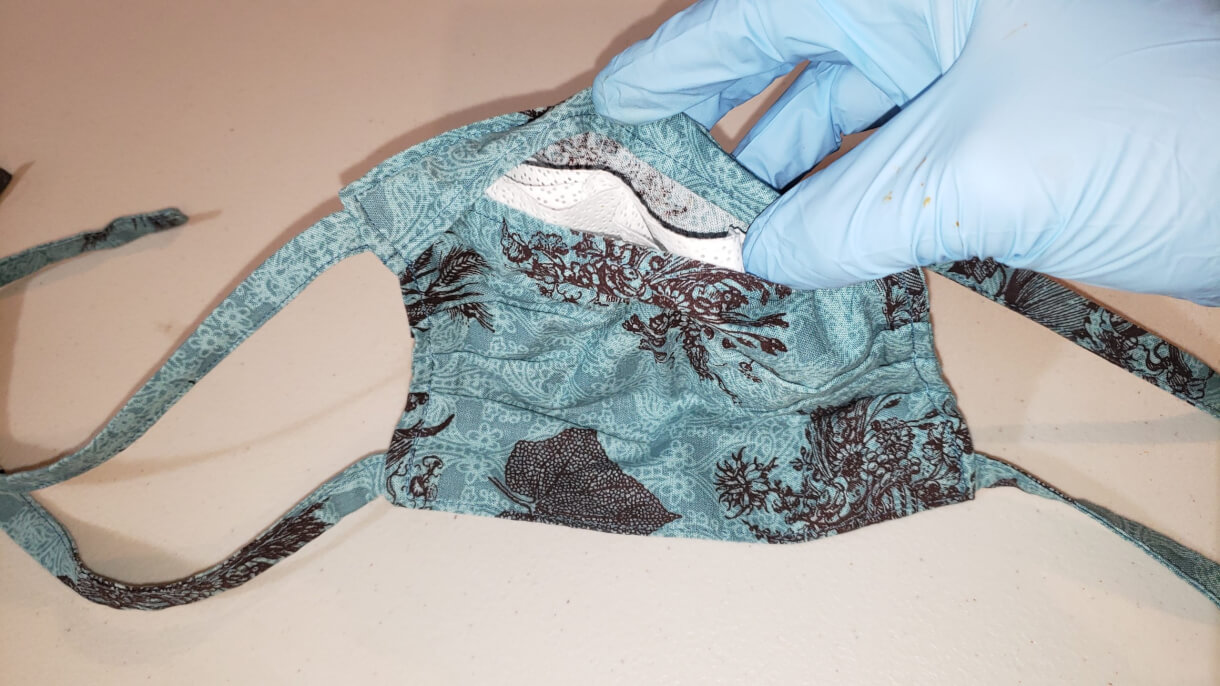
Image 29 – Non-woven fabric inserted into the sewn face mask.
Step 30. If you added the nose wire, bend it nose wire and you’re done! (Video 30). If you didn’t add the nose wire, you’re still done!
Video 30. Bending the nose wire.
Second option: Instead of fabric strips, you can use elastic if you have some available (Image 31).
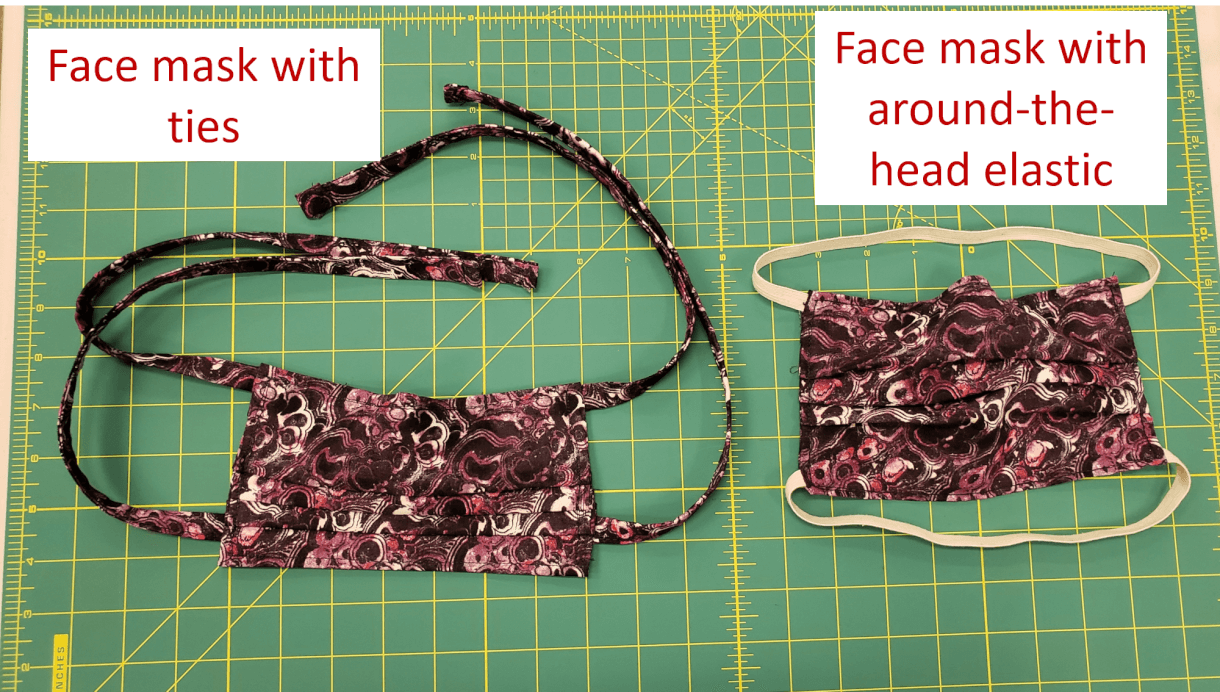
Image 31 – Both options to secure the mask: ties or around-the-head elastic.